Follow My Blog

Follow on Bloglovin

12.15.2013

Feeling Neutral at Sunday Stamps

Love the colour combo we've got going on at Sunday Stamps this time around. It inspired me to create a manly card - those are always hard to do, aren't they?!


The colour combo is Tan, Black & Saffron. I used Sahara Sand & Soft Suede as my "tan", as well as some of that awesome Burlap Ribbon. I used the stamp set Wetlands that I wasn't fond of at first, but grew to love it. Actually, I always loved those tiny birds because they reminded me of the birds my dad always take pictures of on the shorelines in Florida when on holiday. It was the Goose that grew on me. ;)

Hope you'll join us over the next two weeks. We always love seeing your creations! You have until December 27th to submit your entries...


Until next time, stay crafty!
Steph

RECIPE:
Paper: Naturals Ivory, Sahara Sand, So Saffron, Ivory
Ink: Soft Suede, Sahara Sand
Stamps: Wetlands, Sincere Salutations (retired)
Tools: 1" & 1-1/4" Circle Punches
Accessories: Burlap Ribbon

12.14.2013

Challenged!

You may or may not have noticed that I've been MIA lately... there are many reasons for that. One of the main ones is that I've lost my stamping mojo. :( Probably has a lot to do with the busy time of year, working on Christmas cards since July, etc.

I needed to be challenged. I needed something to get my mojo back. Hence, my attempt and entry into this week's Technique Twist Challenge:


Okay. So technically I created two cards for this challenge, but I think they're still somewhat the same card, no? I had this awesome vision in my head and these two cards are my attempt at getting it out on paper. Unfortunately, neither does it for me. ha.

So why am I still blogging about them and entering them into a challenge?!
  1. I wanted to show I'm making progress at getting my mojo back
  2. I don't think they're "bad" cards 
  3. They still involve the Double Stamping Technique

Until next time, stay crafty!
Steph

RECIPE:
Paper: Basic Black, Whisper White, So Saffron, Calypso Coral
Ink: StazOn Black, Calypso Coral, Crisp Cantaloupe, So Saffron
Stamps: Swallowtail, Papillon Potpourri
Accessories: Jewels

Techniques: Double Stamping
Challenges: The Technique Twist

12.10.2013

Team Swap

Every month for the last few months, we've done a team swap. This past month the idea was a holiday card in non-traditional colours. I was still feeling Christmas cards, so that's what I did:


I got the inspiration from a card on Pinterest by Vicki Wu and the Eastern Elegance DSP. I love the colours and designs in it and thought "I could make that work for a Christmas card!". I pulled the colours from the DSP - Summer Starfruit and Smokey Slate and as my neutral, I used Naturals White.

I heat embossed the Beautifully Baroque stamp in Smokey Slate and used the coordinating TIEF of the same name for the background. I heat embossed the sentiment (inside & out) using Silver because I wanted it to stand out more... and what's a Christmas card (or any card for that matter) without some bling?! I randomly adhered some jewels and used some Silver Glimmer Paper. I gotta tell you, I am loving the look of scattering jewels randomly on a project. You should try it out!

Until next time, stay crafty!
Steph

RECIPE:
Paper: Naturals Ivory, Eastern Elegance DSP, Summer Starfruit
Ink: Summer Starfruit
Stamps: Beautifully Baroque, Petite Pairs
Tools: 1-3/8" Circle Punch, 1-3/4" Circle Punch, Beautifully Baroque TIEF, Big Shot
Accessories: Jewels, Summer Starfruit Satin Stitched Ribbon
Techniques: Heat Embossing

12.01.2013

It's Sketchy at Sunday Stamps!

It's a sketch bi-week at Sunday Stamps, starting today. It's a great one too, designed by fellow DT member Hayley! Check it out:


Can you believe it's December already?! I can't believe how fast this year has flown by... I've been making Christmas cards since August and although I'm getting a bit sick of doing them, I still have a few more left in me. :) I got creative with the Merry Little Christmas Simply Created Card Kit that's in the Holiday Catalogue. It's a great kit, for only $11.95, you can make 8 cards! It's even better when you stretch it... so far I've made double that, and I still have pieces left over. :)

This was one of the designs I came up with for my card buffet yesterday. The ladies really loved it. So simple and so easy, thanks in part to the kit & Hayley's awesome sketch!

Hope you can join us and don't forget to check out the other DT member's designs. Visit their Blogs and leave them some love too!

You have until December 13th to play along!


Until next time, stay crafty!
Steph

RECIPE:
Paper: Coastal Cabana, Real Red, Gumball Green
Ink: Gumball Green, Real Red
Stamps: No Peeking (retired)
Kit: Merry Little Christmas Simply Created
Tools: Big Shot, Holiday Collection Framelits (retired)
Accessories: Cherry Cobbler Dazzling Details (on sale now until December 2nd!)

11.18.2013

Sunday Stamps - Late Again!

A day late, but here's my design for this week's Sunday Stamps Colour Challenge. It's a sweet combo of lime, grey & turquoise.


I used Gumball Green, Bermuda Bay & Smokey Slate from Stampin' Up! as my colours. SU! doesn't really have a current "lime" colour anymore, but I thought Gumball Green was a close call and worked really well for this combo. A combo that I really grew to like and think will use again!

I kept it really simple, using the current hostess set in the Holiday Catalogue - Warmth & Wonder. I'm totally in love with the tree. The sentiment is from the same set (gotta love that!) and after adding a few jewels, my card was complete.

Hope you can join us. Remember, it's a bi-weekly challenge, so you have until Friday, November 29th. Don't forget to check out the rest of the Design Team Blogs too and leave them some love. Their designs are sure to inspire you.


Until next time, stay crafty!
Steph

RECIPE:
Paper: Gumball Green, Smokey Slate, Whisper White
Ink: Smokey Slate, Bermuda Bay
Stamps: Warmth & Wonder
Accessories: Jewels

11.13.2013

So Frilly, I Love It!

It's been a while, I know. That's the story of my life right now. ;) Today I'm going to show you a card that I just love. I saw many examples floating around on several online forums and this is a combo of many of them, I was particularly inspired by Dani Dziama's card here.


Isn't the skirt to die for?! So frilly and feminine! I still had some mini cupcake-like wrappers from a kit from the last spring catalogue. They were actually meant to be flowers, but I wasn't feeling that. I cut each in half and then layered until I was happy with the look. 

I cut the figure using the Dress Up Framelits, added some ribbon and a clay flower on top of some embossing and the card was complete. I chose a sentiment that would be perfect for a bridal shower, but could also be used for a birthday or other similar occasion. 

Until next time, stay crafty!
Steph

RECIPE:
Paper: Pretty in Pink, Baja Breeze, Regal Rose
Ink: Baja Breeze
Stamps: Petite Pairs
Tools: Big Shot, Clay Molds, Simply Pressed Clay, 1" & 1-1/4" Circle Punches, Modern Mosaic TIEF


11.06.2013

So Sorry!

I'm so sorry for the long hiatus! It was my every intention to get my posts all lined up to post over the last couple of weeks when I was extremely busy, but I just didn't have the time. I promise to now make a better effort, even though still very busy. :)


This card uses one of the frames from a punched out tag from the Pop & Place Tags. I heat embossed the sentiment & ornaments & then added some of the gorgeous silver ribbon that I'm in love with! It's just perfect for tying little bows.

Until next time, stay crafty!
Steph


RECIPE:
Paper: Cherry Cobbler, Whisper White
Stamps: Ornament Keepsakes, Christmas Messages
Tools: Heat Tool
Kit: Pop & Place Tags
Accessories: 1/8" Silver Ribbon
Techniques: Heat Embossing

10.27.2013

A Week Late @ Sunday Stamps!

I know, I know, I'm a week late posting my Sunday Stamps design! When I didn't get it posted last Sunday and next thing I knew it was Wednesday, I figured I would just wait until the following Sunday. Hope you don't mind. :)


I kept my card super simple. Using the Note Cards & Envelopes, I simply stamped one of the pansy's from Flower Shop, popping the middle one up with Dimensionals. I stamped the image again inside and on the envelope too.

I'm sure you already have, but if not, please stop by to see what the rest of the Design Team has created, leave them some love & hope you'll play along with us! There's still one week to play...


 Until next time, stay crafty!
Steph

RECIPE
Paper: Note Cards & Envelopes (Whisper White)
Ink: Calypso Coral, Crumb Cake, Bermuda Bay
Stamps: Flower Shop
Tools: Pansy Punch

10.26.2013

Where Are You?

Is something you may have been asking? Well, I've been swamped with prepping for shows, motherhood, house renos, etc. I had a very successful show last week. One of the best sellers were these tiny tins (intended as a hostess gift). In the tin I included 40 various gift tags and a roll of tape to give the recipient everything they needed for gift giving.

Well, people loved them so much, they were also buying them for themselves. I sold out and had orders for 20+ more!! So guess what I've been doing... making over 800 tags and trying for more because I would like to have these available at my show on the 3rd too! Anyway, thankfully a good portion of my tags came from the awesome Pop & Place Holiday Gift Tags. You can make 70+ tags and the stamp set is perfect. Leave it to me to stretch this kit to the limit!! I used every punch, every template and every piece of scrap I can use from the entire booklet, including the front & back covers. Pictures of the tags will come soon, but I also wanted to share with you that I created several cards with it too. Here's one of them:


The Crumb Cake frame is indeed from the booklet. All I did was emboss it, mount it, did a little stamping and viola! Each booklet got me 4 of these cards and I can't wait to show you what else I created with them. Think again before you discard all those pieces you think you don't need. ;)

Until next time, stay crafty!
Steph

RECIPE
Paper: Soft Suede, Whisper White, Cherry Cobbler
Ink: Cherry Cobbler
Stamp Set: Joyful Christmas
Tools: Big Shot, Fancy Fan TIEF, Heat Gun, Embossing Powder - Silver & Cherry Cobbler
Accessories: Jewels

10.19.2013

Gold Foil

I am so ridiculously busy prepping for my upcoming shows (first is this Monday), but I just had to show you this card I made last night:


I just about screamed when it was all put together. The Gold Foil in the Holiday Catalogue is TO DIE FOR! I've done a similar card to this a couple of years ago, but it doesn't even compare to this one. I hope you love it too... and feel the need to get some Gold Foil paper. Love all the gold (and usually I'm not a "gold" person). I even gold-embossed the inside message. ha.

I'll be stocking up on this stuff for sure!

Until next time, stay crafty!
Steph

RECIPE
Paper: Gold Specialty Paper, Gold Foil
Stamps: Love and Laughter
Tools: Big Shot, Manhattan Flower TIEF, Heat Gun

10.18.2013

Nothing But Embossing


So, if you don't know by now, I sell all my cards and today I have some quick and easy ones to show you. In fact, the reason for having ignored my Blog for the last several days is because I'm preparing for a big show on Monday.


After this year's retirement of colours and products, I was left with a lot of product, paper especially. I sold some off and have come up with several projects to help use up the remainder that I can no longer demonstrate with... but that I still love and can utilize in my card sales. Of course, I'd like to share these ideas with you too!

These cards are so simple and I love them! I went with tone-on-tone and each layer is embossed and popped up on the base. I have made several different varieties using many of my embossing folders, some specific to special occasions, like birthdays, and others like this one featured here that can be used for any occasion.

You can view most of my varieties here. I sell them in packs of three, with envelopes for $6.00.

Until next time, stay crafty!
Steph

RECIPE
Paper: Lucky Limeade
Tools: Big Shot, Manhattan Flower TIEF

10.14.2013

Happy Turkey Day!

Happy Thanksgiving to all my fellow Canadians out there! I saved this turkey card especially for today. How cute is he?! I CASEd it from Sandie Conner, you can find her card here. I couldn't resist. :)


This little guy was pretty easy to make thanks to the Owl Builder Punch (you cut the ears off). Next, simply cut some ribbon, fold (held together with glue dots) and stick to the back of your turkey. The whites of the eyes and the wattle are also from the same punch - the wattle is the heart. I cut the beak free-hand.

After stamping the sentiment for the front that reads "Thanks is for giving", I thought it would be cute for the inside of the card to say "...and turkey eating! Happy Thanksgiving!!" so I created the inside in MDS.

If you would like to purchase this card, you can do so here.

Until next time, stay crafty!
Steph

 RECIPE
Paper: Crushed Curry
Stamps: Seasonal Sayings
Tools: 2-1/2" Circle Punch, Owl Builder Punch
Accessories: Gumball Green Satin Stitched Ribbon, Tangerine Tango Satin Ribbon (SAB 2013)


10.13.2013

Fall Pumpkin

A couple of Blog posts back, I talked about how I utilize MDS for everything. Here is another example of what can be done with it:


This is a CASE, but now I cannot find the card online to give proper credit! I found it on Pinterest and thought I had pinned it, but unfortunately did not. I tried searching for it again, but don't remember how I came across it in the first place. I will keep an eye out...

Anyway, I ran my card base through the printer after creating the text in MDS. I fit two per page. Then I embossed two pieces of card stock in the same base colour and adhered to the base. You thought I was going to tell you how to emboss around the text, weren't you?! ;)

Next, I punched three ovals using the XL Oval Punch, embossed and glued together. The pumpkin stem was created with the Modern Label punch.

If you would like to purchase this card, you can do so here.

Until next time, stay crafty!
Steph

RECIPE
Paper: Baked Brown Sugar, Pumpkin Pie
Stamps: Occasions Alphabet
Tools: Big Shot, Square Lattice TIEF, Perfect Polka Dots TIEF, Punches: Modern Label, XL Oval
Accessories: Twine

Techniques: Punch Art

10.12.2013

Falling Leaves

It's the countdown to Thanksgiving here in Canada, so as you may have noticed already, I've been showcasing fall and Thanksgiving cards this week. :) It's my favourite time of year!


I used the masking tape technique for this card. I think it's a perfect fit! It created a rustic-looking base layer to my card. I used my oh-so-favourite, but sadly retired, French Foliage stamp set and then added some burlap for added texture. Truth be told, it was added to cover up a sentiment I didn't like. :) I'm glad to have made that mistake because the burlap really works for me. It give the card a lot of texture and dimension, plus, the smaller sentiment works better than what I previously used.

If you're interested in purchasing this card (and seeing more pictures of it), you can do so here.

Until next time, stay crafty!
Steph

RECIPE
Paper: Naturals White, Chocolate Chip
Stamps: French Foliage (retired), Teeny Tiny Wishes
Tools: Decorative Label Punch, Distressing Tool
Accessories: Brads, 1-1/4" Burlap Ribbon

Techniques: Masking Tape, Distressing

10.11.2013

Truly Grateful

I love My Digital Studio (MDS)! I use it all the time. I use it to create all my signage and advertisments for my business (including my business cards) and I utilize it a lot for making hybrid cards.


I loved the Truly Grateful stamp set when I first saw it in the Holiday Catalogue. But let's face it, it was one of many that I loved on my very long wish list. As I searched the online store, I discovered the digital stamp set and I did a little happy dance!

Now, there are things that you couldn't do with a digital brush set - emboss it for one thing, but there are lots of things that you can do. You can resize a stamp image (enlarge to a certain extent without pixelating it), colour it and place it anywhere you want. I created my harvest layer to the exact size I wanted. I fit four on a page, along with my sentiment and a few other digital images from the set for the inside.

I printed the sheets on my home printer, cut and punched and then I layered with some other items to create a hybrid card. For MDS, I am truly grateful. :)

If you love my work, aren't crafty, or just don't have the time, you can purchase this card in my online store here.

Until next time, stay crafty!
Steph

RECIPE
Paper: Naturals Ivory, Pumpkin Pie, Crushed Curry
Stamps: Truly Grateful Stamp Brush Set (MDS)
Tools: Artisan Label Punch, Scallop Oval Punch, Distress Tool, Chevron TIEF
Accessories: Brads, 1-1/4" Burlap Ribbon

10.09.2013

Birthday Cake

Today's post is later than I had hoped, but I hope it was worth the wait! ;)


I created this card a few weeks ago for a dear friends' birthday. It was perfect because this card requires hand-delivery and we were going out for tea, so she had this card displayed on the table the entire time for her birthday celebration. Isn't the cake tea light adorable?! I found it on Pinterest (of course!) and you can find the awesome tutorial here on Jill George's Blog.

I didn't follow it exactly. I didn't bother with the separate template for the "icing". I just found the middle on the back, punched a hole and then cut slits that were long enough so that my flame could slide through.

On the back of the card, I punched a hole with the labels punch pack so that the switch could be turned on and off. My friend love it and I think I'll be making a bunch of mini cakes now. :)

Until next time, stay crafty!
Steph

RECIPE
Paper: Regal Rose, Pretty in Pink, Whisper White, SAB DSP
Ink:
Perfect Plum
Stamps: Simply Sketched
Tools: Punch Pack, 1-3/4" & 2-3/8" Scallop Circle Punches, Labels Punch Pack
Accessories: Jewels, Stitched Grosgrain Ribbon

10.06.2013

It's a Sketch Week!

Well, a sketch week for two weeks that is! If you didn't know already, Sunday Stamps is a bi-weekly challenge now... leaves you plenty of time to join us!! This time around, Marie has a great sketch for us. It's her first time hosting a sketch, so show her some love and play along, won't you?


I kept my card fairly simple. Only one layer and no "bling". Gasp! I love it though. I added a couple more pieces than what appear in the sketch, but the basic elements are all there and that's what sketch challenges are all about.

Since next weekend is Thanksgiving here in Canada and Fall is my favourite time of year, I created a Thanksgiving card. The wavy element in the sketch reminded me of leaves blowing in the wind. I simply created a template from scratch paper to mask my area and stamped away. I then stamped the three leaves in Baked Brown Sugar, Summer Starfruit and Cherry Cobbler tone-on-tone on top of cardstock. I ruffly cut out each leaf, distressed the edges with my scissors and scrunched them up to give them more dimension. To add to the harvest feel, I took out some strings from the new burlap ribbon from the Holiday Catalogue (LOVE it!) and tied together with a piece of twine.

Hope you'll play along with us - you have until October 18th! Don't forget to check out the rest of the DT Designs too because they will inspire you!


Until next time, stay crafty!
Steph

RECIPE
Paper: Very Vanilla, Cherry Cobbler, Baked Brown Sugar, Summer Starfruit
Ink:
Cherry Cobbler, Baked Brown Sugar, Summer Starfruit
Stamps: French Foliage (retired)
Tools: Word Window Punch, Modern Label Punch
Accessories: Twine, 1/4" Burlap Ribbon
Techniques:
Distressing

10.05.2013

Pinwheels are Fun!

I've always wanted to make a card with pinwheels, but never seemed to get around to it... until Vickie Y inspired me with her cards here. Check out my creation:


There was something about the bright colours against the stark black that caught my eye. I am so happy with the results - I made this same card in Daffodil Delight (pictured here), Pumpkin Pie, Tempting Turquoise and Rich Razzleberry. I think this card can also work for either gender. It was also a great way to use colours I don't normally gravitate to and use up some retiring DSP. :)

If you'd like to purchase this card, you can do so here (and the other colours too).

Until next time, stay crafty!
Steph

RECIPE
Paper: Basic Black, Daffodil Delight, Brights DSP Paper Stack (retired patterns)
Tools: Big Shot, Cuttlebug EF,
Accessories: Neutrals Brads
Techniques:
Dry Embossing


10.03.2013

Santa Suit

Here's a fun and cute card for ya:


The pieces were actually leftover from a gum packet covering that I created last year (yes, I kept the pieces for an entire year!). I never got around to putting them all together. Those gum packs were a bust - too time consuming and not very popular compared to my other offerings. But I think these cards will be a hit!

What do you think?

You can purchase them here in my online store.

Until next time, stay crafty!
Steph


RECIPE
Paper: Basic Black, Whisper White, Real Red
Ink: Real Red
Stamps: Delightful Decorations (retired)
Tools: Big Shot, Petals-a-Plenty TIEF, Curly Label Punch, 1/2" Circle Punch
Accessories: Glimmer Brads
Techniques:
Dry Embossing

10.01.2013

Home Decor with MDS

I love My Digital Studio (MDS)! I'm not much of a scrapbooker (although, I've wanted to be several times), but I use the program for all my business advertising, making hybrid cards (using brush stamp sets that I don't own, for example) and more recently, to create home decor pieces.


I wanted and needed a nice alphabet decor piece for my son's room. I wanted one that had both the capital and small of each letter, plus an image to represent each letter with something that we would know and be able to pronounce. No xenops' in this print! ;)

You can also purchase the print in my online store here.

Until next time, stay crafty!
Steph

9.26.2013

Piece of Cake

For an SU! event I attended a couple of weeks ago, I created a swap card. Check it out:


Lots of techniques on this card - distressing, clear block stamping & paper piecing. I love SU! Designer Series Paper (DSP) because it's double-sided and coordinates so beautifully. Makes paper piecing so easy!

You'd never know it, but I stamped the cake image on the back of the DSP I used (in the bottom corner) so that I could cut out the pieces I needed for the cake. I didn't have to waste any DSP this way and I hid it all with my top layer. ;)

If you'd like to purchase this card, you can do so here.

Until next time, stay crafty!
Steph

RECIPE
Paper: Crumb Cake, Very Vanilla, Birthday Basics DSP
Ink: Pool Party, Summer Starfruit, Early Espresso
Stamps: Sketched Birthday, Petite Pairs
Tools: Distressing Tool, Spritzer
Accessories: Summer Starfruit Satin Stitched Ribbon, Jewels
Techniques:
Clear Block Stamping, Distressing, Paper Piecing

9.23.2013

Coral Floral for Sunday Stamps

I know, it's Monday and I'm late with my post! The truth is, I have come to realize that many of my photos were extremely dark. I spent yesterday retaking all my photos, and took several of this card. I was finally happy with it, but now dropping it into Blogger, it seems very off.


Paper: Pistachio Pudding, Naturals Ivory, Gold, Calypso Coral
Tools: Big Shot, Honeycomb TIEF, Blossom Punch, Boho Blossom Punch
Accessories: Pearls
Can I just say that I'm in love with Pistachio Pudding! Such a yummy colour, and I think that paired with Calypso Coral and Gold is a super sweet combination! I will definitely be using this one again.

This card is very simple. No stamping, just punching! I still had several flowers left over from a kit I had (that happened to be in Calypso Coral) and then all I did was pair some with some punches with the Blossom Punch. I punched one in the Pistachio Pudding layer to let the card base show through and then used the punched out flower for the inside of my card.


Be sure to check out what the rest of the Design Team has created over at Sunday Stamps and I hope you love this colour combo as much as I do!


Until next time, stay crafty!


Steph


9.21.2013

Holiday Napkins

Whether you're throwing a holiday party this season, or attending one, these napkins will be a hit!

Tools: Big Shot, Northern Flurry TIEF
Who would've thought to emboss napkins?! Well, someone did (I found it on Pinterest). I wish the post was linked to the creator, but it wasn't. I would love to give proper credit...

Anyway, these are so simple to make. All you need is your Big Shot and an embossing folder of your choice. They're perfect to use at your party, or package them up and give them as a gift at a party you're attending.

If you don't have the tools or the time to make these yourself, you can buy them from my online store here.

Until next time, stay crafty!
Steph

9.16.2013

Drive's Me Crazy!

For all you crafters out there, doesn't it drive you crazy when you see something that's mass-produced that costs more than what you could probably make it for? For example, greeting cards. I have to laugh almost every time someone gives me a card because they almost always apologize to me (!) that it's not one of mine, it's not as beautiful, it's not...

Paper: Bermuda Bay, Pool Party, Whisper White
Ink: VersaMark, Melon Mambo
Stamps: Ornament Keepsakes, Patterned Occasions (SAB 2013)
Tools: Big Shot, Cloudy Day TIEF, Ornament Framelits, Heat Tool,
Embossing Powder: Pool Party & Pewter
Accessories: Jewels, Baker's Twine

I'm shocked sometimes what people pay for cards! Yes, I always turn a card over to look. :) I recently received one for my birthday that was $7.99 +tax! It was nice, but it got me thinking about taking cards like that and recreating them Hofkissed style. Hence, the card I'm showing you today.

The card I received had a hot air balloon carrying a cupcake, so that's what I wanted to do too. I didn't have a hot air balloon, so I used the Ornament Keepsakes stamp set and coordinating Framelits. It was meant to be! I heat embossed with Pool Party on Pool Party card stock for a tone-on-tone look. The small cupcake from the SAB 2013 set worked perfectly and instead of drawing the ropes on for the balloon, I used Baker's Twine.

I'm really happy with how it came out. I've toyed with the idea of adding more. Thought about adding strips of silver glimmer paper or zig zags in Crushed Curry. Perhaps I will, but I'm also loving the single punch of colour!

Until next time, stay crafty!
Steph

9.15.2013

Genius!

Well, I thought this idea was anyway! Check it out:


I'm always on the hunt for ideas... whether it's cards, design, organization, you name it, I'm looking for it! The latest hunt was for ideas on displaying my cards and other product for sale. My upline & friend Leena Girsa showed me her idea for display by using newspaper racks to display her product. I thought that was genius. I immediately went out and bought some (did I mention I was impatient when it came to implementing new ideas?!). They display product beautifully - most recently, they displayed product for the vendor sale I participated in to sell off gently used or new product. People even commented on how organized my table was!

Anyway, after seeing Leena's idea and purchasing some for myself, I walked up and down the aisles at Solutions (a home organization store here in Canada). I mean EVERY aisle. Even ones that I thought wouldn't matter. There were a few possibilities, but then I saw the shoe racks. Even better, I saw the above shoe display (yes, that's what it's for) on clearance because it was the floor model. What did I care?! It was in excellent condition! I think the sales reps were shocked to see me buying it... little did they know what I was going to do with it.

This stand is AWESOME! Each "basket" is somewhat closed off so that I don't have to worry too much about items falling through. A few cheapy baskets I bought fit perfectly and house all my tags and little sale items nicely. The baskets even move up and down to accommodate larger items, and best of all, it sits on a table top AND has a carry handle! What more can a gal ask for?!

The point is that when you're looking for new ideas, think "outside the box". It's something that was drilled in my head when I took Graphic Design, and I think that's a huge part of why I think the way I do sometimes. You never know where an idea will come from!

Until next time, stay crafty!
Steph

9.14.2013

She Believed She Could...

I attended a Stampin' Up! workshop last weekend that was filled with business tools, techniques, projects & more. One of the projects was a canvas home decor piece. Check it out:

Ink: Blushing Bride, Soft Suede, Baked Brown Sugar, Primrose Petals
Stamps: Feel Goods
Tools: Big Shot, Gift Bow Bigz L Die,
Oval Framelits,
Punches:
Pansy, Bitty Butterfly
Accessories: Build a Banner Kit, Doilies, Buttons, Pearls
I'll admit that I wasn't too keen about this at first, but on second glance (and a little tweaking for the recipient of it), I started to get excited. Thank you Jamilla Ivits for creating this piece for the workshop because it's probably something that I wouldn't have otherwise thought about doing!

I hope I didn't offend by tweaking her design a bit. I don't know why, but I saw a plaid pattern when holding the stripe stencil in my hand (which is how Jamilla's banner was done). I'm thrilled with the way it came out! The plaid is really the major thing I changed. All the other elements are the same, I just moved them around a bit.

I surprised my daughter with this by hanging it in her room. She was so grateful and appreciative that I made this just for her. After seeing that, I was so happy that I gave project a chance!

Until next time, stay crafty!
Steph

9.10.2013

Organization: Part 4

Today is my last post on my new craft space and organization. I'm sorry that I'm squeezing so many photos/ideas into one post, but I've got so many projects lined up that I'm eager to share!

 
Two of these units sit under my main desk and they are awesome! They hold many of my essential tools - scrubs, clear blocks, embossing, piercing, office supplies, etc. I also discovered that the deeper drawers (3 out of 5) house two cardboard photo boxes and therefore I can have different items in the same drawer, but keep like items together.


I wish IKEA still made these, but I'm glad that I at least have a couple. This one has six drawers of varying sizes that hold my larger adhesives (Dimensionals, Sticky Strip & Glue Dots) and larger embellishments like my pearls & jewels. The other unit has nine equals drawer units and houses all my extra adhesives. It's a great way to keep track of inventory!


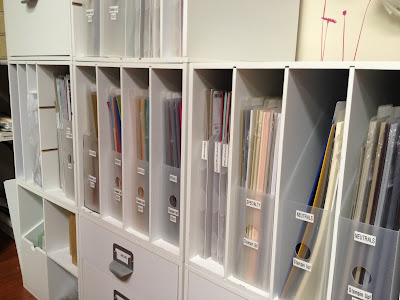
These cubed units have been with me for years! They are stackable and some can be flipped so that you can use them two different ways. As you can see, they house the majority of my stash - all my paper (that are in plastic dividers, organized by colour family/type), ready-made cards, envelopes, dies, Framites, etc. I think I've finally figured out a configuration that works.

From all these pictures, the commonality is the labelling! From these and photos in the previous posts, you've probably noticed that I label everything. Do I have a labelling addiction? Well, perhaps, but it really does make my entire space more efficient. If something is hiding in a drawer, I don't have to open several to find what I'm looking for.

As I mentioned in my first post in this series, I like to see everything in my space. If I don't see it, I won't use it. It's impossible to physically see everything, labelling makes that happen! ;)

Until next time, stay crafty!
Steph


9.09.2013

Organization: Part 3

Today I'm going to show you a shelving unit I designed and that my awesome husband made:


Isn't it sweet?! As I was researching organization ideas, I saw many versions of the stamp pad holders. I also wanted/needed something for my stamps because previously, they were in drawers and on top of my desk.

Now that SU! has the new & awesome wood-mount stamp cases, all the stamps naturally fit in the same space. Also, I strongly felt ink and stamps needed to be in the same space, as well as, my markers, sponges & reinkers. The shelf I designed accomplishes just that!

Here is the breakdown of how I've organized it:

  • Reinkers - at the very top in a green basket (sorry, it's not very visible in the photo)
  • Stamps - sit on the shelves (how do you organize your stamps? I'm not sure if I should do it in alpha order or by type). Each shelf can fit approximately 42 single cases. For my husbands' sake, I hope that's enough! ;)
  • Sponges - I used the Decorative Label Punch to punch the card stock colour and stapled it to the corresponding sponge. These all sit together in a glass container from IKEA. I'm not a dauber person.
  • Stampin' Write Markers - are in clear-mount stamp cases with labels designed by Kimberly Barker - she so generously shared these with all the Demos on our Demo-Only site.
  • Inks - I prefer to organize them by colour, not by colour family as in the SU! Catalogue... but my shelving unit can accommodate that if I choose to organize them that way in the future.

I've got another post or two on organization, so make sure to come back!

Until next time, stay crafty!
Steph

9.08.2013

Honeycomb for Sunday Stamps

It's Sunday and our bi-weekly challenge over at Sunday Stamps. This week is a sketch challenge (created by yours truly) and I hope you can play along with us!

Paper: Calypso Coral, Pistacio Pudding, Naturals Ivory
Tools: Big Shot, Honeycomb TIEF
Accessories: Pearls, This & That Washi Tape, Die Cut Flowers (retired)
I'll start by saying that I am really happy with this card - the 15+ pearls in the center of the flower and the pleated Washi Tape draws the eye, I think. But to be honest, I had been thinking for the past few weeks (since I created this card) that since it was my sketch and the challenge fell on my birthday, that I should create a birthday card with this sketch layout. I unfortunately never got around to it...


Well, maybe I'll create some belated birthday ones with this sketch. It's a simple & versatile one. So versatile, you should head on over to Sunday Stamps (if you haven't already) and check out how the rest of the design team used it & then play along! As always, they rocked it... and there are even a couple of birthday-themed ones too. :)

Until next time, stay crafty!
Steph

9.07.2013

Organization, Part 2

Today I'm sharing a few more ideas to keep my space organized & items accessible! Do you use you phone, laptop, Netbook, iPad or other device in your space? Then you'll probably be interested to know about these:


You may have seen these on my desk in the first picture of my entire space, found here. These two items are always on my desk and travel with me too. You can see from the picture above how easily they come apart and fold flat! They are holders for your devices - keeps them at a workable and viewable level and for laptops & the like, keeps them cool when you're using them.

If you're interested in purchasing the above products, contact me for more info, or you can purchase them directly from the manufacturer by emailing nupro@rogers.com

These are Canadian made, great quality, super light-weight (less than a pound!!), there are several products available in the product-line in black or white & you won't find anything else similar with all these characteristics for an affordable price (the basic laptop stand, for example, is approximately $20).

Oh, and did I mention that these were invented and created by my dad?! You may have noticed my customized laptop holder with the picture of my daughter on it. :)

Until next time, stay crafty!
Steph


9.06.2013

Organization, Part 1

As promised in my last post, I was going to share several of organization tips with you from my new craft space.


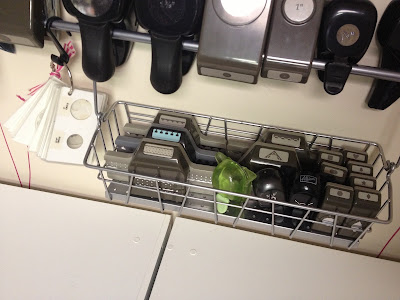
I'm the type of crafter that if I can't see it, I forget about it. So now that I've got all the wall space, I can display all my punches with the Bygel Rail System from IKEA that I've been drooling about since I spotted the ideas on Pinterest ages ago. What I never saw though is people taking advantage of the baskets or hooks that accompany this system.

The basket was perfect to hold all my border punches and smaller punches that either took up too much space on the rail, or didn't fit.

The plastic containers are perfect for all my hand-held punches & other accessories and the hooks, as you can see, are holding my punch templates, tools & my technique cards.

If this is something you'd like to do, I suggest running out to IKEA right now because they are discontinuing this product line!

Below are some previous posts on ways I have organized all my twine, Washi, ribbon & embellishments. Since I've previously blogged about them, I won't repeat it, but I loved these organizational methods so much, I had to incorporate them into my new space. They've worked out so well for me! You can probably see them in the picture in the last post.

Baker's Twine, Washi Tape, Ribbon Scraps Storage

Ribbon Storage

Embellishment Storage


Until next time, stay crafty!
Steph


9.05.2013

What's New?!

Tomorrow marks the two-week anniversary of when we moved into our new house. We're settling in. I'm proud to say that I had 90% of the boxes unpacked within the first week. After that, it's been countless hours of organizing and reorganizing, and organizing some more.

I was finally able to get my new craft space organized, and am happy to report that it is now almost complete! Prior to the move, I did a lot of research on organizational ideas and planning of my new space. Well, a space that is open to a space that the whole family can use (and see, so I better keep it clean!), plus an area where my kids can do some crafting and I can hold small-sized classes.

Over the next few posts, I want to share my new space with you. Not in a bragging way, but I'm proud of the organization of it! I gathered ideas from all over and I thought some might benefit you too!


Unlike my last space, I actually have wall space to use here! I kept the same basic layout as before, with my "must haves" all within close reach in front and beside me in drawers. The rest is still within reaching distance behind me in my storage cubes. With more wall space, I was able to free up a lot more table space, which I'm very happy about!

I will go into more detail on certain areas and organization over the next few posts, so stay tuned!

Until next time, stay crafty!
Steph

8.25.2013

We've Got Colour @ Sunday Stamps!

Boy did this colour combo challenge me this week! Black, Fuchsia & Red. Not a combo I would normally do. I got the chance to see some of the other DT member creations as they were posting them and all I wanted to do was CASE those. ha. Didn't think that was allowed... but the other team members ROCKED this combo! Here's what I eventually came up with:

Paper: Real Red, Basic Black, WW, Brights DSP Stack (retired)
Ink: Real Red
Stamps: Petite Pairs
Tools: Big Shot, Windows Framelits, Hearts a Flutter Framelits, Cloudy Day TIEF
Accessories: Baker's Twine, Jewels
I don't know why this colour combo was so difficult for me. Someone probably put it in my head years ago that red & pink clashed... and my hands just didn't want to put the two colours together. :) Anyway, I finally figured something out and I think it works!

I hope this colour combo inspires you and don't forget to check out the rest of the Design Team over at Sunday Stamps because like I said, they rocked this one!

Until next time, stay crafty!
Steph