Follow My Blog

Follow on Bloglovin
Showing posts with label Punch: Modern Label. Show all posts

3.27.2014

Sunday Stamps... on Thursday

Okay, so the week got away from me a bit. This past Sunday, we started another challenge over at Sunday Stamps. Hope you'll play along with us. It's a sketch challenge, featuring my sketch. After a small hiatus from the DT at Sunday Stamps, I'm glad to be back!


It wasn't until after I posted this to the team Blog that I noticed I extended my banner across the entire card. Oops! But I guess I can get away with it because you can still see the basic sketch principles there, right?

The card is pretty simple. I didn't want to distract too much from the clay flower. Isn't it gorgeous?! I dyed the clay before adding it to the mold. Gotta love the clay accents because they pack a punch AND they add little weight to a project. You know I'm partial to SU! Product, and while they have some awesome molds, I had to venture elsewhere to feed my clay addiction. :)

Don't be afraid... play along! Check out what the rest of the amazing DT ladies have come up with too and show them a little love. You have until April 4th.


Until next time, stay crafty!
Steph

RECEIPE:
Paper: Naturals White, Gingham Garden DSP, Whisper White, Primerose Petals
Stamps: Teeny Tiny Wishes
Tools: Punches - Word Window, Modern Label & 2-3/8" Scallop Circle
Accessories: Clay & Clay Molds

1.24.2014

DSP Series: Gift Bag

Today is my last post in my week-long series on using Designer Series Paper. If you've been following along, I hope you've enjoyed this series. If you're just joining in, you might want to check out the previous posts. :)

I've saved the best one for last! I created a mini bag with four 3x3 cards, four envelopes and five tags from just one piece of DSP. I based the bag off of my original creation here.


I won't go into too much detail here because I'll have a photo tutorial on creating this bag next week and you can also view the original post for my full bag by viewing the link above.

These are so quick and easy to put together and make great gifts! With just one piece of DSP and a few sheets of card stock, you can create a mini stationary set with cards and tags and the bag it all comes in can be reused also for a small gift. Do you love it?!

Until next time, stay crafty!
Steph

RECIPE:
Paper: Birthday Basics DSP, Card Stock: Naturals, Raspberry Ripple & Bermuda Bay
Tools: Modern Label Punch
Accessories: Stampin' Up! Mini 3-⅛" x 3-⅛" Whisper White Envelopes

1.15.2014

Watercolouring with Tissue Paper

If you missed my post yesterday, check it out because it'll explain how to do this technique. Today, I'm showing you a project I created with it.


Since I didn't get a lot of colour variation (and ended up with a lot of white space) in my paper, I cut the "good" pieces into 2-3/4"squares. I layered them on top of 3" square cards. The two colours that were prominent resembled closely to Wisteria Wonder and Calypso Coral, so those were the papers I used.

I created some coordinating envelopes using the awesome new Envelope Punch Board from Stampin' Up! and then included two sentiments with Dimensionals on the back for the recipient to choose either, or none for that matter, depending on the occasion.

I decided to individually package them. Not sure what I'll do with them yet. I've thought about randomly handing them out to people I meet or a "thank you" gift for customers who place orders with me. So many possibilities!!


Until next time, stay crafty!
Steph

10.13.2013

Fall Pumpkin

A couple of Blog posts back, I talked about how I utilize MDS for everything. Here is another example of what can be done with it:


This is a CASE, but now I cannot find the card online to give proper credit! I found it on Pinterest and thought I had pinned it, but unfortunately did not. I tried searching for it again, but don't remember how I came across it in the first place. I will keep an eye out...

Anyway, I ran my card base through the printer after creating the text in MDS. I fit two per page. Then I embossed two pieces of card stock in the same base colour and adhered to the base. You thought I was going to tell you how to emboss around the text, weren't you?! ;)

Next, I punched three ovals using the XL Oval Punch, embossed and glued together. The pumpkin stem was created with the Modern Label punch.

If you would like to purchase this card, you can do so here.

Until next time, stay crafty!
Steph

RECIPE
Paper: Baked Brown Sugar, Pumpkin Pie
Stamps: Occasions Alphabet
Tools: Big Shot, Square Lattice TIEF, Perfect Polka Dots TIEF, Punches: Modern Label, XL Oval
Accessories: Twine

Techniques: Punch Art

10.06.2013

It's a Sketch Week!

Well, a sketch week for two weeks that is! If you didn't know already, Sunday Stamps is a bi-weekly challenge now... leaves you plenty of time to join us!! This time around, Marie has a great sketch for us. It's her first time hosting a sketch, so show her some love and play along, won't you?


I kept my card fairly simple. Only one layer and no "bling". Gasp! I love it though. I added a couple more pieces than what appear in the sketch, but the basic elements are all there and that's what sketch challenges are all about.

Since next weekend is Thanksgiving here in Canada and Fall is my favourite time of year, I created a Thanksgiving card. The wavy element in the sketch reminded me of leaves blowing in the wind. I simply created a template from scratch paper to mask my area and stamped away. I then stamped the three leaves in Baked Brown Sugar, Summer Starfruit and Cherry Cobbler tone-on-tone on top of cardstock. I ruffly cut out each leaf, distressed the edges with my scissors and scrunched them up to give them more dimension. To add to the harvest feel, I took out some strings from the new burlap ribbon from the Holiday Catalogue (LOVE it!) and tied together with a piece of twine.

Hope you'll play along with us - you have until October 18th! Don't forget to check out the rest of the DT Designs too because they will inspire you!


Until next time, stay crafty!
Steph

RECIPE
Paper: Very Vanilla, Cherry Cobbler, Baked Brown Sugar, Summer Starfruit
Ink:
Cherry Cobbler, Baked Brown Sugar, Summer Starfruit
Stamps: French Foliage (retired)
Tools: Word Window Punch, Modern Label Punch
Accessories: Twine, 1/4" Burlap Ribbon
Techniques:
Distressing

11.27.2012

Mr. & Mrs. Snowman

Today I have a couple of cute tags to show you. I have seen many like this floating around the net, so I can't credit just one person with the idea. For my tags though, I used the stamp set Stylin' Snowfolk and that I have not seen yet. :)

Paper: Whisper White, Basic Black
Ink: Black, Peach Parfait, Blushing Bride, Pool Party
Tools: Big Shot, Two Tags Bigz Die, Modern Label Punch, Curly Label Punch
Accessories: Basic Grey Ribbon, Primrose Petals Satin Stitched Ribbon, Baker's Twine
The base is a tag using the Two Tags Bigz Die. For the "Mr.", I made his hat using 1/2 the Curly Label Punch and the Modern Label Punch. All the stamping is using the Stylin' Snowfolk stamp set. Perhaps I was inspired by Movember, which is why I gave my "Mr." a stash... to finish off, I added a ribbon scarf to each.

I made this cute couple into a pair of hanging tags. Perfect for holiday gifts!

What do you think?

Until next time, stay crafty!
Steph

11.12.2012

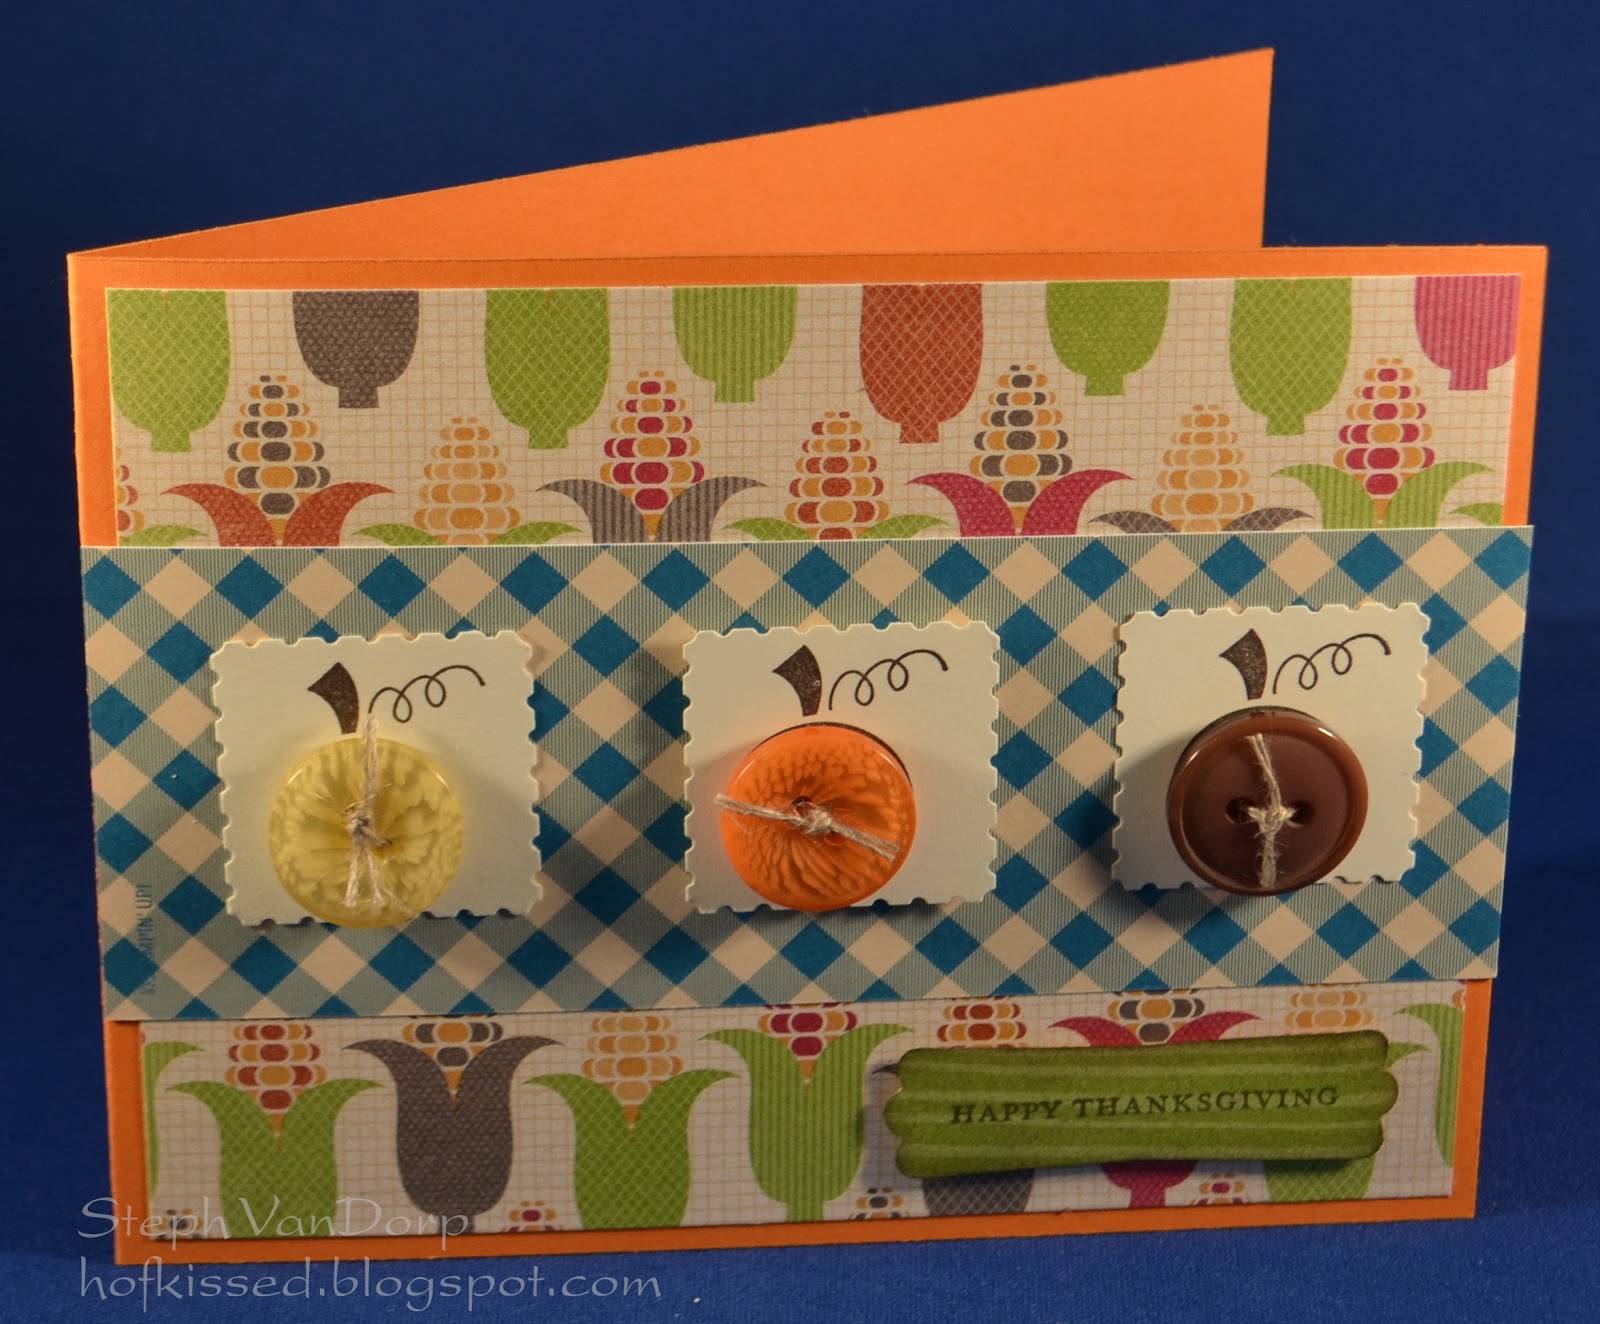
Button Buddies Harvest

Even though Thanksgiving is long gone for us Canadians, the US will be celebrating in just a couple weeks. As I mentioned in my last post, I had to create some Thanksgiving cards for a client for her US friends and here is another one I made:

Paper: Pumpkin Pie, Harvest DSP, Very Vanilla
Ink: Early Espresso
Stamps: Button Buddies, Teeny Tiny Wishes
Tools: Postage Stamp Punch, Modern Label Punch
Accessories: Buttons, Linen Thread
This one didn't require much thought because Button Buddies does the work for you. Our buttons coordinate so nicely with this stamp set! I love the Harvest DSP too and the colours are just so festive for this time of year.

Until next time, stay crafty!
Steph

11.11.2012

It's a Colour Challenge!

This week at Sunday Stamps, we've got a colour challenge for you - it's all about Fall, ya'll! How perfect this was for me because I needed to make some Thanksgiving cards for a client to send to her US friends who will be celebrating in a couple of weeks.

Paper: Early Espresso, Cajun Craze, More Mustard, WW, VV
Ink: More Mustard
Stamps: Teeny Tiny Wishes
Tools: Big Shot, Square Lattice TIEF, Modern Label Punch, Word Window
Accessories: Half Back Pearls (retired), Baker's Twine

I hope you can play along with us this week... don't forget that every time you enter a challenge this month, you will be entered in a draw for a chance to win one of two $25 Stampin' Up! gift certificates!

Until next time, stay crafty!
Steph

9.23.2012

Old and New

Boy has time gone by fast! A few days ago I posted some cards I made using Simply Scrappin' kits and accents. I challenged myself and others to try creating some too! Today I'm showing you some cards I made with the retired Christmas Lane Simply Scrappin' kit. To bring some new elements in, I used the new Joyous Celebrations stamp set.


Paper: Christmas Lane Simply Scrappin' Kit, Whisper White, Early Espresso, Wild Wasabi, Soft Suede
Ink: Early Espresso, Wild Wasabi
Stamps: Joyous Celebrations
Accessories: Cherry Cobbler Seam Binding Ribbon, Baker's Twine, Buttons, Dazzling Diamonds
As you can see, three very different cards, but all from the same line of products! I just love the possibilities. With a Simply Scrappin' kit, you can make up to 30+ cards depending on how you use the product.

What do you think?

Until next time, stay crafty!
Steph

9.12.2012

Ribbon Stem Flower

Today's card was inspired by some ribbon weaving I saw online. Thought it would be nice to create a flower stem with it. Have a look:


Paper: So Saffron, Whisper White, Island Indigo, Calypso Coral
Ink: Calypso Coral, More Mustard, So Saffron
Stamps: Fabulous Florets, Petite Pairs
Tools: Big Shot, Apothecary Accents, Paper Piercing Pack, Modern Label, Blossom Punch
Accessories: Ribbon (retired), Brights Button

The base and layer with the Apothecary Accents Framelit is pretty self explanatory. For the flowers, I stamped the flowers from Fabulous Florets in Calypso Coral ink on Whisper White. I then used my Blender Pen with Calypso Coral, More Mustard and So Saffron ink to get the desired look I wanted. To make my flowers larger so that the proportions would look right with the stem and the card, I punched two flowers in Calypso Coral using my Blossom Punch. Placing the punch behind my stamped flower, I started to bend and fold the petals to align better with the image. For the smaller flower, I cut each of the five petals and glued them behind. I think I achieved the look I was going for.

What do you think?

Until next time, stay crafty!
Steph

7.25.2012

Another CAS Button Buddy

Yesterday I showed you a birthday card made with the cherry stamp set from Button Buddies. You can view it here if you missed it. Today I have a similar card using the rattle from the same set. Here's that card:

Paper: Whisper White
Ink: Crumb Cake
Stamps: Button Buddies, Teeny Tiny Wishes
Tools: Big Shot, Designer Frames TIEF, Modern Label Punch, Word Window Punch
Accessories: Buttons, Baker's Twine
This is the exact same layout as yesterday and I used all the same tools. The only difference is that I did some faux stitching with my Crumb Cake marker all around the card, punch-out and embossed part of the card. Pretty CAS and I like it!

Short and sweet today... what do you think?

Until next time, stay crafty!
Steph

7.24.2012

Cherries Please!

I know Button Buddies has been around for a while now, but it's been on my wish list since the beginning and I finally got my hands on it. I kept pushing it down the wish list as new stuff came out. I hoard buttons because I love 'em and yet, don't use them too often. I bought this stamp set to get me using all my buttons! Here's my first card with my newly acquired set:

Paper: Whisper White, Real Red
Ink: Early Espresso (marker), Old Olive (marker)
Stamps: Button Buddies, Teeny Tiny Wishes
Tools: Big Shot, Designer Frames EF, Modern Label Punch, Word Window Punch
Accessories: Buttons
This is probably the cleanest and simplest card I've ever done. I usually like lots of layers and embellishments, but I was feeling the "less is more" vibe for this one.

All I did was start with a Whisper White note card and emboss it with one of the Designer Frames Textured Impressions Embossing Folders. After that, I inked up the cherry stamp from the Button Buddies set with my Early Espresso and Old Olive markers, stamped it and added the buttons with glue dots. I popped up the sentiment with Dimensionals and viola!, a CAS card done in less than 5 minutes.

What do you think?

Until next time, stay crafty!
Steph


7.02.2012

R is for Rest

Today is somewhat of a day of rest since here in Canada, most are taking today off in lieu of the Canada Day holiday yesterday. I found a small time-frame to stamp a little, but was having a creative block. So I turned to the Blogs out there...

One of my new favourite challenge blogs is Sunday Stamps. This week the ladies posted a sketch challenge and that's just what I needed to get inspired. Here's the sketch:


I've been using My Digital Studio (MDS) a lot lately for hybrid projects. This means that you create a portion of your project in MDS and then print it and finish creating with other stamps, paper, ribbon, etc. I have bought a lot of stamp brush sets in MDS that I don't have myself and especially ones that I might not use as often. It's an economical (and space-saving!) way to get all the images you desire. Plus, it's so easy to change the size or the colour and you can print right from your home computer!

Anyway, here is my hybrid card:


Although I've never been, sailing just seems like such a relaxing thing to do and since today is a day of relaxation, I thought this MDS stamp brush set was a perfect one to use. It's kind of funny that this is a Retirement card because this stamp set - Sail Away - is actually retired. Along with the Nautical Expeditions DSP, but the two are a perfect fit with one another. :)

I actually printed two sailboats and then cut the sail from one of them and popped it up. It gives a lot of dimension to an otherwise flat card. I also really distressed the edges of the DSP, sailboat and mat. I added some Bakers Twine and a Naturals Designer Button, both of which I thought looked a little nautical when paired with the DSP and sailboat. The sentiment on the front is from Teeny Tiny Wishes (my go-to sentiment set!) and the inside is from Occasions Alphabet. I must say that I don't use the latter set too often, but it really does pair well with many stamp sets and sentiments. Adds a little more oomph to a project.

What do you think?

Until next time, stay crafty!
Steph

5.31.2012

The May 31st Blahs

Tomorrow, the new Stampin' Up! catalogue goes LIVE! I for one cannot wait because there are fantastic products coming. So many great new stamp sets, papers & accessories. I know you'll love it too!

Maybe my creative funk lately is because I'm saving all my creative juices until I get my hands on those new products! :) June 1st can't come soon enough...

Speaking of June, the coming month seems to be all about the men. When I think of June, I think of BBQing (not that women can't do that too!), Father's Day and the beginning of Summer. I have also been doing a lot of "manly" cards lately... Maybe the month of June has something to do with that.

Here is a hybrid card I did recently that has deemed to be very popular. The motorcycle is a stamp image I purchased in My Digital Studio (MDS) - big news around MDS in the new catalogue too! - and the sentiment is hand stamped. Simple, but I think it turned out great!

What do you think?


Until next time, stay crafty!
Steph

5.26.2012

The Bashful Blues

A while back I designed a few wedding invitations for some clients. They really liked Bashful Blue with white. They fell in love with one design in particular and before I knew it, I was making 170 of them! Here is what the final result looked like:


There was lots of embossing and cutting to be done! This invite was very time consuming... I don't know what I was thinking when I designed them, but I'm sure you can agree that they came out beautifully with lots of WOW factor. :) Unfortunately, aside from the Bashful Blue & Whisper White, not much else is SU! The client fell in love with the embossing folder used on the front of the invite (also used behind the invitation itself) and SU! doesn't have any fancy decorative embossing borders that would work with this invitation.


Now that you have a little background information on the wedding invitations, you'll understand my theme for the 100 thank you cards I just completed for the couple. I really couldn't commit to doing the same card 100 times, so I made several different designs. I also added in some neutral colour tones to the colour scheme and here are the finished cards:

 Stamps: Baroque Motifs (retiring May 31st), Sincere Salutations (retiring May 31st)

Stamps: Baroque Motifs (retiring May 31st), Perfect Punches

Stamps: Sincere Salutations (retiring May 31st)

Stamps: Papaya Collage (NEW for 12/13!), Tiny Tags

Stamps: Sincere Salutations (retiring May 31st), One of a Kind (RETIRED)

Stamps: Teeny Tiny Wishes

Stamps: Baroque Motifs (retiring May 31st), Elizabeth (retiring May 31st), Perfect Punches
 
 Stamps: Sincere Salutations (retiring May 31st), Faith in Nature, Hostess Set (retiring May 31st)

The majority of materials used for these cards was SU! However, I did manage to get rid of some non SU! ribbon I had kicking around (slowly I'm switching over to all SU! product because it's far superior to other brands!) and also some retired SU! product I had too.

What do you think?

Until next time, stay crafty!
Steph

4.24.2012

For Elizabeth

Today's card is for my mother's birthday. Her name is Elizabeth, so it only seemed fitting to use the soon-to-be-retired À la Carte stamp called Elizabeth. Her (BIG) birthday isn't until May, but this card also showcases some product from the current Occasions Mini. So I felt it was important to show it off as some product you'll only be able to purchase until April 30th.

What do you think?

Until next time, stay crafty!
Steph


Supplies

Stamps:
- Elizabeth #117120 - retiring May 31st
- Teeny Tiny Wishes, #115370 - one of my go-to sets because you get 24 greetings! Plus every greeting coordinates perfectly with two punches (Word Window, #119857, Modern Label, #119849)

Paper:
- Beau Château Designer Series Paper (DSP), #122357
- Very Vanilla 81/2 x 11 Card Stock, #101650

Ink:
- Soft Suede Classic Stampin' Pad, #115657
- Marina Mist Classic Stampin' Pad, #119668
- Blushing Bride Stampin' Write Marker*
- Pear Pizzazz Stampin' Write Marker*
* part of the 2010 - 2012 In Color marker set, #119801, these will be retiring colours

Accessories:
- Antique Brads, #117273 - love these!!
- Victoria Crochet 5/8" Trim, #118481
- Blushing Bride 3/8" Pleated Satin Ribbon, #125570 - Occasions Mini, available until April 30th.
- Big Shot, #113439
- Framelits Dies - Labels Collection, #125598 - Occasions Mini, available until April 30th.
- Vintage Wallpaper Embossing Folder, #120175