Follow My Blog

Follow on Bloglovin
Showing posts with label Technique: Dry Embossing. Show all posts

10.13.2013

Fall Pumpkin

A couple of Blog posts back, I talked about how I utilize MDS for everything. Here is another example of what can be done with it:


This is a CASE, but now I cannot find the card online to give proper credit! I found it on Pinterest and thought I had pinned it, but unfortunately did not. I tried searching for it again, but don't remember how I came across it in the first place. I will keep an eye out...

Anyway, I ran my card base through the printer after creating the text in MDS. I fit two per page. Then I embossed two pieces of card stock in the same base colour and adhered to the base. You thought I was going to tell you how to emboss around the text, weren't you?! ;)

Next, I punched three ovals using the XL Oval Punch, embossed and glued together. The pumpkin stem was created with the Modern Label punch.

If you would like to purchase this card, you can do so here.

Until next time, stay crafty!
Steph

RECIPE
Paper: Baked Brown Sugar, Pumpkin Pie
Stamps: Occasions Alphabet
Tools: Big Shot, Square Lattice TIEF, Perfect Polka Dots TIEF, Punches: Modern Label, XL Oval
Accessories: Twine

Techniques: Punch Art

10.05.2013

Pinwheels are Fun!

I've always wanted to make a card with pinwheels, but never seemed to get around to it... until Vickie Y inspired me with her cards here. Check out my creation:


There was something about the bright colours against the stark black that caught my eye. I am so happy with the results - I made this same card in Daffodil Delight (pictured here), Pumpkin Pie, Tempting Turquoise and Rich Razzleberry. I think this card can also work for either gender. It was also a great way to use colours I don't normally gravitate to and use up some retiring DSP. :)

If you'd like to purchase this card, you can do so here (and the other colours too).

Until next time, stay crafty!
Steph

RECIPE
Paper: Basic Black, Daffodil Delight, Brights DSP Paper Stack (retired patterns)
Tools: Big Shot, Cuttlebug EF,
Accessories: Neutrals Brads
Techniques:
Dry Embossing


10.03.2013

Santa Suit

Here's a fun and cute card for ya:


The pieces were actually leftover from a gum packet covering that I created last year (yes, I kept the pieces for an entire year!). I never got around to putting them all together. Those gum packs were a bust - too time consuming and not very popular compared to my other offerings. But I think these cards will be a hit!

What do you think?

You can purchase them here in my online store.

Until next time, stay crafty!
Steph


RECIPE
Paper: Basic Black, Whisper White, Real Red
Ink: Real Red
Stamps: Delightful Decorations (retired)
Tools: Big Shot, Petals-a-Plenty TIEF, Curly Label Punch, 1/2" Circle Punch
Accessories: Glimmer Brads
Techniques:
Dry Embossing

8.21.2012

Christmas Swap

I recently participated in and organized swap from Leena Girsa. The goal was to showcase products from the Holiday Catalogue. I chose to focus on Christmas, using the Merry Minis stamp set. Here's what I came up with:

Paper: Cherry Cobbler Core'dinations, Whisper White
Ink: Crumb Cake
Stamps: Merry Minis, Greetings of the Season
Tools: Big Shot, Vintage Wallpaper TIEF, Sanding Block, Window Framelits, Merry Minis Punch Pack
Accessories: Crumb Cake Seam Binding Ribbon, Glimmer Brads, White Bakers Twine
I just love the new Core'dinations card stock! Not only do you get texture, but get different colour tones too. I didn't think this card needed too much more when I featured the Cherry Cobbler Core'dinations card stock. It's just so beautiful on it's own.

I also knew I wanted my ornaments to hang, but didn't just want to glue them to the paper, so I got the idea to hang them in a "window" using the Window Framelits.

To finish off, I added a banner with a bow and my Swap was done. I hope the group liked it.

What do you think?

Until next time, stay crafty!
Steph

8.11.2012

Falling Leaves

There were several things that got me thinking about making a fall card for today's post. For one, the  Holiday Catty has many new items in it. Then there was a fall card we made at a recent techniques class. Add on top of that the gloomy, colder weather we've had the last couple of days (that I don't mind so much), and I guess this all inspired me to make a fall card.

Paper: Comfort Cafe DSP, Crumb Cake, Soft Suede, Cajun Craze
Ink: Soft Suede
Stamps: Teeny Tiny Wishes
Tools: Big Shot, Autumn Accents Bigz Die, Woodgrain TIEF
This was a pretty simple card to put together. I started with some scraps I had left over from another project - the Comfort Cafe DSP rectangles. I created a "window" with them. Next, I cut the oak leaf from Cajun Craze with the new Autumn Accents Bigz Die and ran it through with the Woodgrain Textured Impressions Embossing Folder.

To finish off, I used some strips of scraps and curled them around a pencil and glued them to the leaf. I added my sentiment and the card was done! Now I've got a beautiful Thanksgiving card to give to someone... two months from now! :)

What do you think?

Until next time, stay crafty!
Steph

8.10.2012

Did You Hear?

SU! retired fabric is on sale... for only $1.19!! While I admit (sadly) that I don't know how to sew, I can say that it works great for papercrafting too! Did you know you can use our fabric for card making and scrapbooking? Here's a quick card I whipped up with some of the retiring fabric:


Paper: Cherry Cobbler Core'dinations, Pool Party
Ink: Riding Hood Red
Stamps: Tiny Tags
Tools: Big Shot, Vintage Wallpaper TIEF, Sand Blocks, Window Frame Framelits
Accessories: Candy Cane Christmas Fabric

All I did to get this look is rip strips of fabric (I like the frayed edge) and adhere them to my card base. The trick when using fabric to paper is to use our Big Shot Adhesive Sheets. These are great because you can cut them to any size you want and despite the name, they are not just for use in the Big Shot!

For my focal image, I cut a piece of Cherry Cobbler Core'dinations Card Stock with the second smallest Framelit from the Window Frames Collection. I sanded it a bit and then mounted it on a piece of fabric I cut that was the next size up.

I tied a strip of fabric in a knot and adhered it with a glue dot to some tiny tags I punched out with the Little Labels Punch Pack.

The fabric is a great deal and it's only while supplies last! Check out the fabric on sale below and contact me today to place your order.
What do you think?

Until next time, stay crafty!
Steph


7.25.2012

Another CAS Button Buddy

Yesterday I showed you a birthday card made with the cherry stamp set from Button Buddies. You can view it here if you missed it. Today I have a similar card using the rattle from the same set. Here's that card:

Paper: Whisper White
Ink: Crumb Cake
Stamps: Button Buddies, Teeny Tiny Wishes
Tools: Big Shot, Designer Frames TIEF, Modern Label Punch, Word Window Punch
Accessories: Buttons, Baker's Twine
This is the exact same layout as yesterday and I used all the same tools. The only difference is that I did some faux stitching with my Crumb Cake marker all around the card, punch-out and embossed part of the card. Pretty CAS and I like it!

Short and sweet today... what do you think?

Until next time, stay crafty!
Steph

7.23.2012

Have You Ever...

Have you ever placed an SU! order and once receiving it, you were stumped what to do with it?! Well, that's exactly what happened to me! My order was set to come on Friday, my Mr. Brown usually comes between 5 and 7 p.m. Well, he surprised me at 8 a.m. on THURSDAY!! I was so excited... I wanted to give him a BIG hug, but he ran away. :)

Anyway, I opened it all up, mounted my stamps, organized everything and sat down at my workspace later that day. And I just starred. I picked up a stamp set, set it down. And starred. This process repeated several times with different stamp sets until I gave up and had to go relax...

Now here we are Monday and I'm now sick, BUT, I did manage to get in some stamping time yesterday! Yippee. My creative block was over! Here's what I came up with:

Paper: Baja Breeze, Whisper White, Glimmer, Festival of Prints DSP Pack (avail. Aug. 1st)
Stamps: Greetings of the Season (avail. Aug. 1st), Stylin' Snowfolk

Ink: Baja Breeze, Black
Tools: Big Shot,
Snow Flurry Bigz Die (avail. Aug 1st), Adorning Accents Edgelits, Adorning Accents EF
Accessories: Vintage Buttons, Sweater Trim (avail. Aug. 1st), Tiny Black Brads (non SU!)

I thought the Vintage Faceted Buttons would be perfect to create a snowman with. I used some non SU! brads that I stuck through the button holes for the eyes and buttons. I added some Sweater Trim (available August 1st in the Holiday Catalogue) for the scarf and stamped and popped up the had from Stylin' Snowfolk.

I got the idea for the snowy hills from Amy White. You can see Amy's card here. I just thought it added so much dimension to the card. Lastly, for a bit of whimsy, I made a large snowflake with the Snow Flurry Bigz Die (available August 1st in the Holiday Catalogue), cutting one snowflake in Silver Glimmer Paper and the other two from Whisper White. I then added the smallest Vintage Faceted Button to the center.

What do you think?

Until next time, stay crafty!
Steph

7.12.2012

Never Done This Before...

I created a card that works for THREE challenges this week! Now that's a challenge! :) The card I designed works for the sketch over at Freshly Made Sketches, the colour combo at The Paper Players and the picture inspiration over at Stampin' Royalty. Here are the details:


For my card, I switched the sketch layout from Freshly Made to portrait instead of landscape and shifted the focal box slightly to one side. I kept within the colour scheme from The Paper Players and from the picture inspiration at Stampin' Royalty, I went with the floral and vintage/cottage feel. Here is my card:

Paper: Whisper White, Calypso Coral, Lucky Limeade, Everyday Enchantment DSP
Ink: Lucky Limeade, Calypso Coral, Daffodil Delight
Stamps: Fabulous Florets
Accessories: Vintage Brad
Tools: Big
Shot, Vintage Wallpaper Embossing Folder, Dimensionals


I started by embossing the Whisper White card base with the Vintage Wallpaper embossing folder. I choose two patterns from the SAB Everyday Enchantment DSP pack and mounted them on Calypso Coral card stock. Next, I stamped the large leafy image from Fabulous Florets in Lucky Limeade, once, on Whisper White card stock. The rest of the images are also from the same stamp set. I stamped each on Whisper White as well and fussy-cut them all out. I layered them using Tombow and Dimensionals so that certain parts would pop-up to give added texture and dimension. To add even more depth to the flower I stamped in Calypso Coral, I cut it out three times in different sections of the image. I popped up each layer with Dimensionals again to give it a 3D look. I added a Vintage Brad to finish things up - perfect fit, I think!

What do you think?

Until next time, stay crafty!
Steph

7.10.2012

The Olympics Are Coming!

I don't know about you, but when the Olympics are on, I'm pretty much glued to the TV. Perhaps a little more in the winter than in the summer, but I do enjoy watching the events. This week over at The Friday Mashup!, they've got an Olympic-inspired sketch. Here are the details:


So here is the "Mashup" Challenge :

  1. Make a project with "The Olympic Colour Combination of Marina Mist, Basic Black, Daffodil Delight, Wild Wasabi & Real Red."
  2. Or Make a Project using "Multiple Circles."
  3. Or "Mash it Up" and create a project with the "Olympic Color Combo and Multiple Circles."

I usually tend to "Mash it Up" because I find it more challenging that way. This week was no exception! Here's what I came up with:


Stamps: Papaya Collage
Ink: StazOn Black, Marina Mist, Real Red, Daffodil Delight, Wild Wasabi
Paper: Whisper White, Basic Black
Embellies: Jewels
Tools: Big Shot, Framed Tulips Embossing Folder
, 1-3/8" Circle Punch


I just love Papaya Collage! It's such a versatile set - a flower, leaves, a bird, frames, a party hat and a butterfly. You wouldn't think they all go together, but they work! I choose this set because I just adore the rosette and knew it would work well in a punched out circle.

I first stamped the frame in black (isn't it gorgeous?!) and then I masked it so that I could stamp the leaves without stamping over the frame. I stamped and punched the rosettes and popped them up with Dimensionals. I also embossed a frame around the entire card using the Framed Tulips Embossing Folder and added some jewels around the inner frame for a little bling.

I like to pretty-up the inside of my cards to coordinate with the outside, so I stamped some leaves and then fussy-cut 2 rosettes. I popped the Real Red one with Dimensionals to give it all a bit of depth.

What do you think?

Until next time, stay crafty!
Steph

7.09.2012

Freshly Made

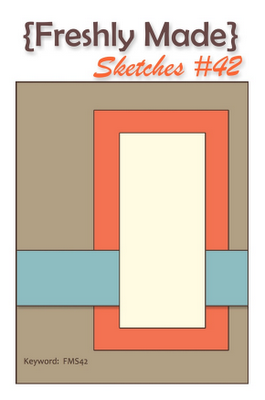
Today I'm playing with the ladies at Freshly Made Sketches. It's my first time playing, but I liked the sketch and that this challenge site focuses on clean-lined and fresh creations. Here's the sketch:
It's actually quite fitting that I'm playing along today at Freshly Made because there's (finally) fresh air outside. It's been so hot and humid around here lately that I really missed having the windows open. Such a nice change!

Anyway, here is my card:


Okay, so I roughed up the edges just a tad. But not too much, so I think it still qualifies for "fresh" and "clean-lined", no?

I finally got around to using the Fine Feathers stamp set. It's one that drew my attention immediately in the new catty, but every time I pulled it out, I just couldn't come up with anything. This sketch certainly got my creativity flowing with it... and it's about dang time! :)

I started with a very detailed section from the Fan Fair DSP pack. It featured some lace, a flower, a washed out map and the Eiffel Tower (mostly hidden). I then layered with a piece of Island Indigo card stock that I embossed with the Fancy Fan embossing folder. Next, I stamped two feathers in Pool Party ink on Very Vanilla card stock and then cut one feather out and popped it up with some Dimensionals. I wrapped some Pool Party Bakers Twine around and added a punched tag. I stamped the sentiment from the Just My Type set and elongated the tag by pulling the paper up and through the Jewelry Tag Punch. The trick is to have your paper the same width as the punch. You can then make the tag as long (or short) as you want. Cool, eh?!

To finish off, I used the retired Lace Border Punch and added some pearls. I mimicked this on the inside too by stamping a couple of feathers and adding the border again with the pearls.

What do you think?

Until next time, stay crafty!
Steph

7.07.2012

Baby, Baby, Baby

I finally got a chance to ink up Baby Boutique. I just fell in love with that set in the new catty... but then again, what set didn't I fall in love with?! Anyway, an idea popped into my head as I was surfing the net and came across a colour challenge over at Hand Stamped Sentiments. Here are the details:


As soon as I saw the colour Calypso Coral as part of the challenge, I thought about using some of the Calypso Coral Organdy Ribbon that was part of the last SAB bundle. It's just the perfect size for little bows. And my idea was to create little bows on the booties in Baby Boutique. Here's my card:


These certainly aren't your typical baby colours, but this card could work for either boy or girl. Aren't the booties adorable?! I stamped those in Daffodil Delight. The card base and Seam Binding Ribbon are also Daffodil Delight. The embossed polka dot panels are in Baja Breeze, along with the punched out mat with the Modern Label punch. The sentiment is from Teeny Tiny Wishes and stamped in Calypso Coral. For texture and dimension, I added lots of ruffles and bows and a couple of pearls.

What do you think?

Until next time, stay crafty!
Steph

7.06.2012

A Colour & Sketch Challenge Duo

It is hot, hot, hot here in Cambridge today... a perfect excuse to stay inside and get all inky! :) Today I decided to combine two challenges in one card. There was a sketch challenge over at Mojo Monday and a colour challenge over at Stampin' Royalty. Here are the details:


When the stamp set Tea Shoppe came out in the last Occasions Mini, I just fell in love. I haven't had much opportunity however, to play much with it, so it's probably a good thing that I gravitated to it when I sat down to work on a card for these challenges. The colour combo of Basic Gray, Daffodil Delight and Baja Breeze are also such a calm trio and also thought it would be a great fit for the stamp set. Here's my card:


I used the Rock & Roll technique on the smaller tea cups. First, I inked up in Daffodil Delight and then rocked and rolled the inked up stamp over the Baja Breeze ink pad. It gives the image kind of a vintage/patina look to it. Cool, eh?!

To add some dimension and texture to the card, I cut some labels from the Labels Collection Framelits in Baja Breeze and Very Vanilla and embossed them with the Fancy Fan embossing folder. I also stamped the largest tea cup from the stamp set in Baja Breeze on Very Vanilla card stock and fussy-cut it out. I do love to fussy-cut, honestly! I think I may be one of very few out there that do enjoy it. ha. To finish, I added some Daffodil Delight Seam Binding Ribbon, layered a few pieces together and stamped some flowers on the inside in Basic Gray. Viola!

What do you think?

Until next time, stay crafty!
Steph

6.30.2012

Feeling Girly

I made this card a while back... but I'm feeling girly tonight and thought that it was just too cute not to share with you! I got the idea for the little dress from a card I saw in our monthly Demonstrator magazine and had to make some. The original had three dresses on the front, I opted for one and wanted to have it "hanging" on a clothes line.


I used my favourite (but retired) pink, Blushing Bride, for the majority of the card. The little dress is actually the body from the Owl Builder Punch - how cute is that?! I also happened to have Pleated Ribbon (also retired) in Blushing Bride to add a little ruffle to the bottom of the dress. It also happened that I had a bunch of the Whisper White frames left over from another project (cut by layering two frames from the Labels Collection Framelits) and thought it would be super cute to use that as the "clothes line" anchor. I embossed it using the Square Lattice embossing folder to add some more texture to the card.

The sentiment is from the Itty Bitty Banners stamp set and of course I just had to use the matching Framelits to cut them out! I accented with some jewels, and the heart embossing folder from the Adorning Accents Textured Impressions Embossing set.

What do you think?

Until next time, stay crafty!
Steph

6.25.2012

Love Colour

Today I'm participating in a colour challenge over at Stampin' Royalty. Although I refer to my Colour Coach on occasion, I often forget about referring to that wonderful tool! Colour Challenges are a fantastic way to use colours together that you might not have thought to use together.

I wasn't too keen on these colours at first, but once I got creating I discovered how awesome they look together!! Here is my card:

See what I mean?! The colours look great together. I used a bunch of new product that I just got last week (but didn't have a chance to play with it until yesterday!). I used the new Butterfly Punch... isn't it so elegant?! I also used the new Fancy Fan Textured Impressions Embossing Folder. I love this new folder... I'm so happy SU! had a replacement in mind for the plates they retired with this lovely pattern on it. I embellished with some teeny pearls, some Pool Party Baker's Twine and had to add a brad as an after thought because it covers a smudge. :D But you didn't need to know that because you'd never be able to tell! I thought the butterfly brad from the 2012 SAB redemption pack worked perfectly... even though it's not available any more.

Until next time, stay crafty!
Steph

6.24.2012

I'm Back!

I know, I know... another long hiatus! I was consumed in 4 floors of "stuff" for the last week. We took part in a huge neighbourhood yard sale yesterday and I can't believe how much "stuff" I managed to pull out of my house! I was purging like crazy, packaging and pricing... every day! I had no time for anything fun. :( I shouldn't complain though, my hard work paid off... and I'm not ashamed to say that I crashed before 8 p.m. last night. ha.

Now on to why you came to my blog... the crafty stuff! Since I was on such a long hiatus, I needed some inspiration. What better way to get some inspiration than to find a challenge that interests me. Well, I found two! Mojo Monday and Sunday Stamps. Here are the sketches:


I decided to combine both challenges since Mojo Monday had a sketch challenge and Sunday Stamps had a Colour Challenge. Here is the card I created based on these two challenges:


What do you think? I love, love, LOVE the new Stippled Blossoms stamp set from SU!. It is such beautiful set and since I just got it last week (but didn't have time to play with it!), I had to use it when I found the opportunity to stamp today. I also used one of the new embossing folders from the Delicate Designs Textured Impressions set. I added some Daffodil Delight Seam Binding Ribbon and some hat pins that were in the last Occasions Mini.

I'm really happy with the way this card turned out. Just so cheery!

Until next time, stay crafty!
Steph

6.14.2012

The Last Humming Bird

This is the first time playing with Pals Paper Arts. The challenge this week (PPA136) was a colour challenge. In order to participate, you had to use Real Red, Night of Navy and Whisper White in your design.


Here's what I came up with:


It's hard to tell in the photo, but I interlocked two frames that I cut out with the Labels Collection Framelits and then cut out the inner pieces the same way so that everything would fit nicely together. Cool, eh?! Before gluing everything down, I stamped the floral image from Elements of Style and if you've been following my blog, you'll notice I used that humming bird again (!) from the same stamp set. I promise, that's the last of my humming bird cards for a while. :)

I embossed the card front with the NEW fan embossing folder from SU! and then created a flower with folded ribbon. The Real Red Grosgrain ribbon that I used is retired now, but it's the only ribbon I had in that colour. I threw in some hat pins (also retired), glued on my humming bird and viola!

What do you think?

Until next time, stay crafty! 
Steph

6.12.2012

Swaps

On the weekend, I attended a Demonstrator Event. It was a ton of fun. Part of that event (as I'm told happens with all SU! events), is that there was an optional swap. It was my first one and although it was daunting at first, I can tell you that I'll be participating in them again! So much fun and you get so many great ideas from the cards you receive.

The hard part for me was finding items to use that I had enough of... but after participating in this swap, I found out it's not necessary to have them all the same. Good to know for the future!

So on to my swap card. I really didn't do much stamping with this one, but instead created a fun "locking" card. I used mostly cardstock and fabric.

What do you think?


I just love the Labels Framelits collection. So versatile and easy to use. The Big Shot was definitely my friend on this card. At the last minute, I decided I wanted to also do a little stamping... so I used some stamps from the Papaya Collage and Memorable Moments stamp sets. The latter actually has a nice outline stamp that coordinates with the Labels Framelits. How perfect! I also hand-drew some faux stitching on the front label to mimic the inside stamp... did you catch that? :)

Until next time, stay crafty!
Steph

5.27.2012

Mojo Monday!

Here's the sketch for this week's Mojo Monday:

I'm starting to really enjoy these challenges. I get great inspiration from the sketches and from seeing the other fabulous crafters who post their designs. It's amazing to see so many different creations just from one sketch! I got this one in just in time since the deadline is tonight at 8... here's my take on it:


What do you think?

Until next time, stay crafty!
Steph

5.10.2012

Mother Dearest

Mother's Day is only a few short days away, so today I'm featuring a Mother's Day card instead of a sneak peek... although I might come back later with one of those. :)

This is a step-fold card. The middle section is embossed and then the rest of the panels are covered in FABRIC! Isn't it sweet? The flower is also made entirely of fabric and then accented with one of my favourite vintage brads!

What do you think?


These were a hit at the craft show last weekend and I think I might just have to make some more.

Until next time, stay crafty!
Steph