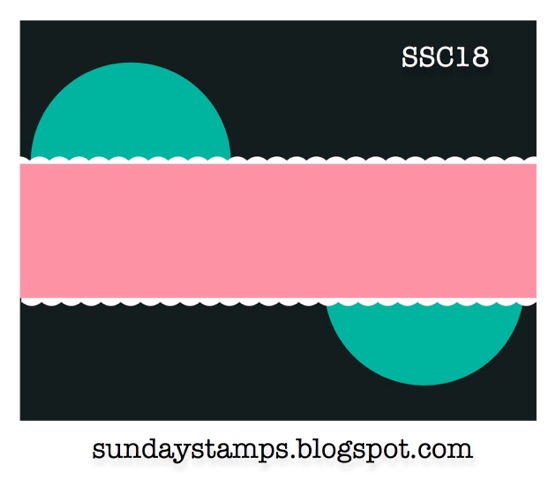
Welcome to another week at Sunday Stamps! So excited to have you join us, and to welcome our new DT member Leena! For the next two weeks, we've got a sketch for ya, and here's what I came up with.
I stuck very closely to the sketch, as you can see. I used some specialty paper from the retired Candlelight Christmas DSP as my focal point. I loved the felting on acetate. From there, I stuck with the reds & used some card stock & glimmer paper along with some Real Red Grosgrain Ribbon (retired).
The tags I punched using the Scallop Tag Topper Punch but instead of using paper that was 2" wide, I cut it down to 1-1/2" and it fit nicely between the scallops at the top.
On the inside, I added some more ribbon, anchoring my sentiment. I really love how this turned out!
I hope that you'll be inspired by this sketch and play along. You have until Friday, September 19th at 6 p.m. to link up and don't forget to check out what the other DT members have created to inspire you!
Until next time, stay crafty!
Steph
RECIPE:
Paper: Soft Suede, Early Espresso, Whisper White
Ink: Early Espresso, Real Red
Stamps: Seasonal Sayings
Tools: 7/8" Scallop Circle Punch, Scallop Tag Topper Punch, Big Shot, Vintage Wallpaper TIEF (retired)
Accessories: Real Red 1/4" Grosgrain Ribbon (retired)
Challenge: Sunday Stamps
Showing posts with label Stamp: Seasonal Sayings. Show all posts
9.07.2014
10.14.2013
Happy Turkey Day!
Happy Thanksgiving to all my fellow Canadians out there! I saved this turkey card especially for today. How cute is he?! I CASEd it from Sandie Conner, you can find her card here. I couldn't resist. :)
This little guy was pretty easy to make thanks to the Owl Builder Punch (you cut the ears off). Next, simply cut some ribbon, fold (held together with glue dots) and stick to the back of your turkey. The whites of the eyes and the wattle are also from the same punch - the wattle is the heart. I cut the beak free-hand.
After stamping the sentiment for the front that reads "Thanks is for giving", I thought it would be cute for the inside of the card to say "...and turkey eating! Happy Thanksgiving!!" so I created the inside in MDS.
If you would like to purchase this card, you can do so here.
Until next time, stay crafty!
RECIPE
Paper: Crushed Curry
Stamps: Seasonal Sayings
Tools: 2-1/2" Circle Punch, Owl Builder Punch
Accessories: Gumball Green Satin Stitched Ribbon, Tangerine Tango Satin Ribbon (SAB 2013)
This little guy was pretty easy to make thanks to the Owl Builder Punch (you cut the ears off). Next, simply cut some ribbon, fold (held together with glue dots) and stick to the back of your turkey. The whites of the eyes and the wattle are also from the same punch - the wattle is the heart. I cut the beak free-hand.
After stamping the sentiment for the front that reads "Thanks is for giving", I thought it would be cute for the inside of the card to say "...and turkey eating! Happy Thanksgiving!!" so I created the inside in MDS.
If you would like to purchase this card, you can do so here.
Until next time, stay crafty!
Steph
RECIPE
Paper: Crushed Curry
Stamps: Seasonal Sayings
Tools: 2-1/2" Circle Punch, Owl Builder Punch
Accessories: Gumball Green Satin Stitched Ribbon, Tangerine Tango Satin Ribbon (SAB 2013)
10.07.2012
Sunday Stamps Challenge - Guest Designer
Good Morning & Happy Thanksgiving weekend to all the Canadians out there! I'm a little under the weather, but well enough to do some stamping and eat some turkey! :)
I have the pleasure this week to be a Guest Designer again over at Sunday Stamps. Lisa has a great sketch this week for you to try:
I love sketch challenges! When I saw the sketch, I wanted something to "peek" out from the circles. What better than some spooky characters from the Googly Ghouls set.
For the middle section, I distressed a piece of DSP from the Orchard Harvest pack and mounted that to a piece of More Mustard card stock. I used the Scallop Border Punch on the edge and then moved it slightly and punched again. This gives a pointed and almost "spooky" look, I think. I sponged the edges of this one too.
To finish things off, I stamped the sentiment and cut and distressed some banners. I added a similar banner on the inside and of course added some Googly Eyes to thoseadorable scary characters. :)
Now head on over to Sunday Stamps and give the sketch a try! It's tons of fun...
Until next time, stay crafty!
Steph
I have the pleasure this week to be a Guest Designer again over at Sunday Stamps. Lisa has a great sketch this week for you to try:
I love sketch challenges! When I saw the sketch, I wanted something to "peek" out from the circles. What better than some spooky characters from the Googly Ghouls set.
For the middle section, I distressed a piece of DSP from the Orchard Harvest pack and mounted that to a piece of More Mustard card stock. I used the Scallop Border Punch on the edge and then moved it slightly and punched again. This gives a pointed and almost "spooky" look, I think. I sponged the edges of this one too.
To finish things off, I stamped the sentiment and cut and distressed some banners. I added a similar banner on the inside and of course added some Googly Eyes to those
Now head on over to Sunday Stamps and give the sketch a try! It's tons of fun...
Until next time, stay crafty!
Steph
9.28.2012
O Tannenbaum
I made some of these folded tree cards last year too, but this year, I thought it would be cute to make them much smaller and what better tool to use then the 2-1/2" Circle Punch?!
Anyway, after punching, I cut the circles in half. You can get two trees from one punch. I know there are templates out there for larger trees, but I just played around with it until I got the fold I wanted. I created my own template on my Grid Paper - basically marking where the first fold should be and then I just folded free-hand.
I wanted a little texture, so I used the Delicate Designs Textured Impressions Embossing Folder in the background. Before gluing my trees down, I added tiny trunks in coordinating card stock. To finish things off, I added some glimmer stars, punched from Silver Glimmer Paper and with the star from the Merry Minis Punch Pack and added a sentiment.
What do you think?
Until next time, stay craft!
Steph
9.11.2012
Thanks is for Giving
Several days back I posted a simple gift set we made at the Regional event in Hamilton. Our team challenge was to create one and bring it to our meeting yesterday. Well, I kinda flubbed it a bit because I do have trouble keeping things simple! I shoulda just stuck to stamps and paper. I guess you can call mine a "stepped up" version. :)
The first issue was that I didn't have any Vellum, so I had to think up another way to create my "case". Once I decided on fabric, it just spiraled out of control from there! I had to use more fabric on the cards, of course, and then I just kept layering and stamping.
I'm really pleased with how they turned out, but certainly not the simplicity that I should have gone for...
What do you think?
Until next time, stay crafty!
Steph
Subscribe to:
Posts (Atom)