

Step 1:
Chose your DSP of choice and punch either 2-1/2" circles & cut them in half (at 1-1/4"), or use your punch to only punch 1/2 circles.

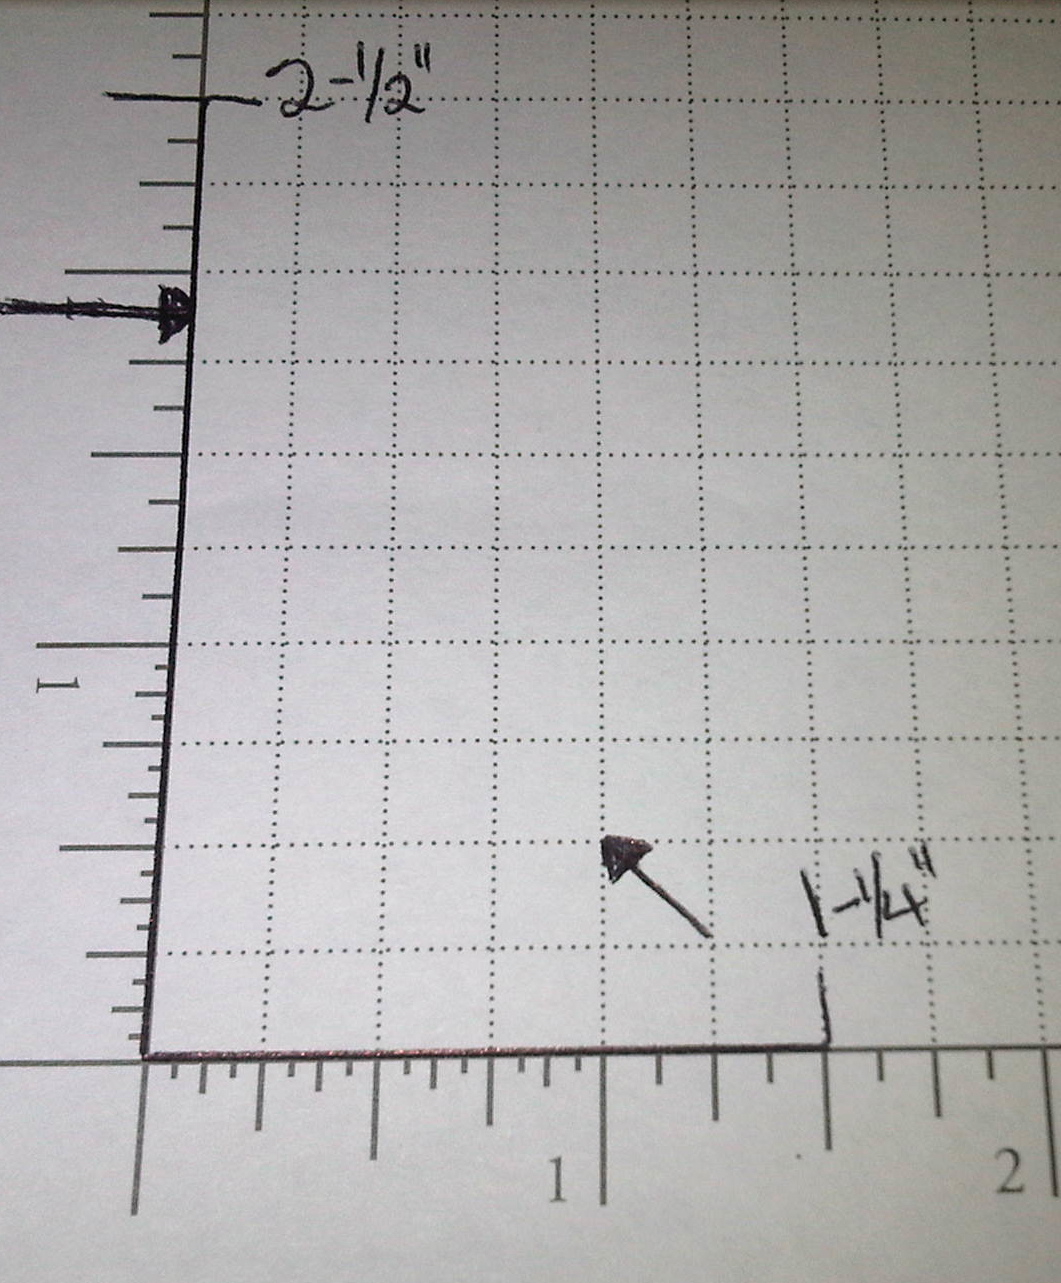
Step 2:
Create a template on your grid paper. I created this one after many attempted folds. :) Draw your markers exactly where I have mine on the grid.
Step 3:
Place your 1/2" circle on your template & fold diagonally using your markers. Your fold doesn't have to line up exact, but close.

Step 4:
Your fold should now look like this.

Step 5:
Now, using the top point as a guideline, fold your next tree layer. I liked having a tad overhang for my trees... I thought it made them look more "real".


Step 6:
Repeat Step 5 to make your last tree layer. Trim the top overhang if you're left with too much.

Step 7:
I glued my tree layers down with Tombow, but this is a personal choice. I didn't want the trees to be too bulky... but you can leave them unglued too if you want.

Step 8:
To finish things off, I cut strips of card stock in coordinating colours for the trunks and used the star punch from the Merry Minis Punch Pack to punch stars from Glimmer Paper. I wanted that bit of shine, but card stock or DSP could work just as well.

I hope this Tutorial has helped you... I would love some feedback since this is my first one. :) Enjoy making these mini trees. BE AWARE, they can be addictive to make!
Until next time, stay crafty!
Steph
Love it - thanks for sharing the instructions on making these! The markers on the grid paper is extremely useful :)
ReplyDeleteThank you for posting this!
ReplyDeleteThanks for taking the time to "show" how to do this, makes it easy to do now!
ReplyDeleteThanks for the great tutorial! Hope you will share more!
ReplyDeleteThis was great! Not the first tute I've seen on how to make these trees, but the simplest to follow. Thanks for taking the time :-)
ReplyDeleteAnother great tutorial Steph. Thanks for the tip on the graph. Makes it a lot easier. I can see these becoming addictive. May use for one of my card class buffet cards as quick to make. TFS.
ReplyDeleteThanks for sharing and the grid paper marks should really help. I can't wait to case this.
ReplyDeleteGreat tutorial Steph!! Thanks for taking the time to share it! I'm going to try some of these this afternoon!!
ReplyDeletewow, I've put a link on my blog to your site, thank you for sharing, these are just fantastic.
ReplyDeleteHello, it is great, thank you!
ReplyDeleteKerstin