I'm so glad to be back designing with this great team again - and excited to have a couple new members too! I took about a two-month hiatus and it feels good to be getting all inky again. This week we've got a colour challenge - Pink Pirouette, Old Olive & Marina Mist.
I've been wanting to make this type of card for a while now and since I never inked up my By the Tide stamp set yet, these colours were calling me to do so! My paper was cut down to 8-1/2" x 5-1/2" and I scored at 3-1/2" and 6". Next, I rant my Window Framelits through the Big Shot, making sure to only have my cutting plates over top of where I wanted to cut. Once that was done, I stamped all my images.
Lastly, I ran my card base through again, this time with the Fancy Fan TIEF. I actually ran it through twice because I wanted the texture to be running a certain way. I thought this TIEF looked like fish scales. ;)
To finish things off, I stamped on a separate piece that I cut with the same Window Framelits and then layered with my various pieces & some twine. The sentiment is from the new And Many More... stamp set. I love the birthday font and the entire set is fast becoming my go-to for sentiments!
Hope you'll play along with us. You've got two weeks to link up, the collection closes on Friday, September 5th. Don't forget to check out the rest of the DT for great inspiration... and welcome the new members too!
Until next time, stay crafty!
Steph
RECIPE:
Paper: Old Olive, Marina Mist, Whisper White
Ink: Marina Mist, Pink Pirouette
Stamps: By the Tide, And Many More
Tools: Big Shot, Fancy Fan TIEF, Typeset Alpha Bigz Die (retired), Modern Label Punch
Accessories: Twine
Challenge: Sunday Stamps
Showing posts with label TIEF: Fancy Fan. Show all posts
8.24.2014
10.26.2013
Where Are You?
Is something you may have been asking? Well, I've been swamped with prepping for shows, motherhood, house renos, etc. I had a very successful show last week. One of the best sellers were these tiny tins (intended as a hostess gift). In the tin I included 40 various gift tags and a roll of tape to give the recipient everything they needed for gift giving.
Well, people loved them so much, they were also buying them for themselves. I sold out and had orders for 20+ more!! So guess what I've been doing... making over 800 tags and trying for more because I would like to have these available at my show on the 3rd too! Anyway, thankfully a good portion of my tags came from the awesome Pop & Place Holiday Gift Tags. You can make 70+ tags and the stamp set is perfect. Leave it to me to stretch this kit to the limit!! I used every punch, every template and every piece of scrap I can use from the entire booklet, including the front & back covers. Pictures of the tags will come soon, but I also wanted to share with you that I created several cards with it too. Here's one of them:
The Crumb Cake frame is indeed from the booklet. All I did was emboss it, mount it, did a little stamping and viola! Each booklet got me 4 of these cards and I can't wait to show you what else I created with them. Think again before you discard all those pieces you think you don't need. ;)
Until next time, stay crafty!
Steph
RECIPE
Paper: Soft Suede, Whisper White, Cherry Cobbler
Ink: Cherry Cobbler
Stamp Set: Joyful Christmas
Tools: Big Shot, Fancy Fan TIEF, Heat Gun, Embossing Powder - Silver & Cherry Cobbler
Accessories: Jewels
Well, people loved them so much, they were also buying them for themselves. I sold out and had orders for 20+ more!! So guess what I've been doing... making over 800 tags and trying for more because I would like to have these available at my show on the 3rd too! Anyway, thankfully a good portion of my tags came from the awesome Pop & Place Holiday Gift Tags. You can make 70+ tags and the stamp set is perfect. Leave it to me to stretch this kit to the limit!! I used every punch, every template and every piece of scrap I can use from the entire booklet, including the front & back covers. Pictures of the tags will come soon, but I also wanted to share with you that I created several cards with it too. Here's one of them:
The Crumb Cake frame is indeed from the booklet. All I did was emboss it, mount it, did a little stamping and viola! Each booklet got me 4 of these cards and I can't wait to show you what else I created with them. Think again before you discard all those pieces you think you don't need. ;)
Until next time, stay crafty!
Steph
RECIPE
Paper: Soft Suede, Whisper White, Cherry Cobbler
Ink: Cherry Cobbler
Stamp Set: Joyful Christmas
Tools: Big Shot, Fancy Fan TIEF, Heat Gun, Embossing Powder - Silver & Cherry Cobbler
Accessories: Jewels
6.11.2013
What's New and MM?
I'm still here... have you been wondering what's going on in my life? Well, my littlest one hit the 3-month mark over the weekend (can't believe that!) and life with kids is pretty busy, but on top of that, we have also decided to sell our house, so that makes life pretty crazy around here lately! Having to keep the house spotless for showings is near impossible with little ones! haha.
Being kicked out of the house for showings and raising two kids has left me little time for designing, but I also didn't want to craft much because my space becomes buried in mere seconds when I'm working. :) It's an organized chaos though... but I didn't think potential buyers would appreciate that.
Anyway, some of the projects I'll be showing you over the next few posts are ones I've done a while back, but haven't yet had the opportunity to showcase them here on my Blog. Here is one CASEd from one seen on Pinterest:
I added a few more layers and dimension then the one I saw and I'm happy with how it turned out. Although, many ask me what "MM" stands for. I thought it was pretty clear that it stood for "Mr. and Mrs." but maybe I'm wrong... what are your thoughts?
Thanks for sticking with me during this time where I'm horribly neglecting my Blog. I appreciate your following and comments!
Until next time, stay crafty!
Steph
Being kicked out of the house for showings and raising two kids has left me little time for designing, but I also didn't want to craft much because my space becomes buried in mere seconds when I'm working. :) It's an organized chaos though... but I didn't think potential buyers would appreciate that.
Anyway, some of the projects I'll be showing you over the next few posts are ones I've done a while back, but haven't yet had the opportunity to showcase them here on my Blog. Here is one CASEd from one seen on Pinterest:
![]() |
| Paper: Basic Gray, Pool Party, Silver Ink: Basic Gray Stamps: One in a Million Tools: Big Shot, Fancy Fan TIEF, Punches: Heart, Owl, Apothecary Framelits, Typeset Alphabet Accessories: Pearls |
Thanks for sticking with me during this time where I'm horribly neglecting my Blog. I appreciate your following and comments!
Until next time, stay crafty!
Steph
3.19.2013
Fancy Wedding
Sometimes I create cards that are truly unique and "one of a kind" because for one reason or another, I wouldn't be able to create an exact replica. Today's card is an example of that (and you'll see why below)... Check it out:
The beauty of this card is that the flower is created from some tulle I saved from another wedding (that had mints in it). I reused the piece of tulle by punching out some scallops and folding them in fourths to create my flower. I then simply added some pleated ribbon and the sentiment and the card was complete.
This card will never be created again because I do not have the tulle anymore and although I managed to punch some scallops from the tulle, it was a real pain & wasted a lot of it trying to get good punches. I love how this card turned out, but it's not worth it to try and recreate it. :)
Until next time, stay crafty!
Steph
![]() |
| Paper: Very Vanilla Ink: Soft Suede, Baja Breeze Stamps: Sweet Essentials, One in a Million Tools: Big Shot, Fancy Fan TIEF, Decorative Label Punch Accessories: Pleated Ribbon (retired), Antique Brad |
This card will never be created again because I do not have the tulle anymore and although I managed to punch some scallops from the tulle, it was a real pain & wasted a lot of it trying to get good punches. I love how this card turned out, but it's not worth it to try and recreate it. :)
Until next time, stay crafty!
Steph
3.03.2013
The Easter Bunny is Coming...
... and he stopped in at Sunday Stamps! This is the first Easter card I created this year. I can't believe Easter is just around the corner!
For the bunny, I whipped out my Watercolour Crayons (haven't used those in a while!) and forgot how easy they were to use. I added some subtle colour and then inked the edges for some pop!
Now check out what the rest of the Design Team has created for you and then play along with us this week! Can't wait to see what you come up with!
Until next time, stay crafty!
Steph
For the bunny, I whipped out my Watercolour Crayons (haven't used those in a while!) and forgot how easy they were to use. I added some subtle colour and then inked the edges for some pop!
Now check out what the rest of the Design Team has created for you and then play along with us this week! Can't wait to see what you come up with!
Until next time, stay crafty!
Steph
2.17.2013
It's Sketch Time at Sunday Stamps!
Haley has a great sketch over at Sunday Stamps this week! She reminds us of something too - that our sketches are just a guideline to aid in your creativity! You don't need to necessarily add every element from our sketches, but as long as you stick to the general idea of them, we're happy. :)
I hope you'll play along with us this week. Make sure you head on over to Sunday Stamps and check out what the rest of the Design Team has created for inspiration!
Until next time, stay crafty!
Steph
I hope you'll play along with us this week. Make sure you head on over to Sunday Stamps and check out what the rest of the Design Team has created for inspiration!
Until next time, stay crafty!
Steph
9.07.2012
Colour Challenged?!
If you're colour challenged... or perhaps just need a little inspiration, online Challenge Blogs are the way to go (I have a list of ones I like to play along with in the left column)!
It's been a while since I've been able to play along with the ladies over at Sunday Stamps, and am happy to play along with Tara's Colour Challenge this week!
The great thing about Colour Challenges is that sometimes they get you using colours together you might never have thought of. Here's the card I came up with:
I embossed my card base and then glued my coloured piece to it. After adding my flowers, I wrapped some Baker's Twine around the card and added my sentiment.
Inside, I stamped the coordinating flower for the punch from the Language of Friendship set. I punched two out and added jewels to them for some extra dimension.
What do you think?
Until next time, stay crafty!
Steph
It's been a while since I've been able to play along with the ladies over at Sunday Stamps, and am happy to play along with Tara's Colour Challenge this week!
The great thing about Colour Challenges is that sometimes they get you using colours together you might never have thought of. Here's the card I came up with:
I embossed my card base and then glued my coloured piece to it. After adding my flowers, I wrapped some Baker's Twine around the card and added my sentiment.
Inside, I stamped the coordinating flower for the punch from the Language of Friendship set. I punched two out and added jewels to them for some extra dimension.
What do you think?
Until next time, stay crafty!
Steph
7.09.2012
Freshly Made
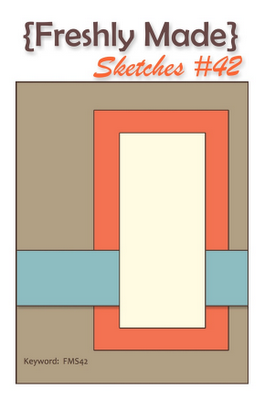
Today I'm playing with the ladies at Freshly Made Sketches. It's my first time playing, but I liked the sketch and that this challenge site focuses on clean-lined and fresh creations. Here's the sketch:
It's actually quite fitting that I'm playing along today at Freshly Made because there's (finally) fresh air outside. It's been so hot and humid around here lately that I really missed having the windows open. Such a nice change!
Anyway, here is my card:
Okay, so I roughed up the edges just a tad. But not too much, so I think it still qualifies for "fresh" and "clean-lined", no?
I finally got around to using the Fine Feathers stamp set. It's one that drew my attention immediately in the new catty, but every time I pulled it out, I just couldn't come up with anything. This sketch certainly got my creativity flowing with it... and it's about dang time! :)
I started with a very detailed section from the Fan Fair DSP pack. It featured some lace, a flower, a washed out map and the Eiffel Tower (mostly hidden). I then layered with a piece of Island Indigo card stock that I embossed with the Fancy Fan embossing folder. Next, I stamped two feathers in Pool Party ink on Very Vanilla card stock and then cut one feather out and popped it up with some Dimensionals. I wrapped some Pool Party Bakers Twine around and added a punched tag. I stamped the sentiment from the Just My Type set and elongated the tag by pulling the paper up and through the Jewelry Tag Punch. The trick is to have your paper the same width as the punch. You can then make the tag as long (or short) as you want. Cool, eh?!
To finish off, I used the retired Lace Border Punch and added some pearls. I mimicked this on the inside too by stamping a couple of feathers and adding the border again with the pearls.
What do you think?
Until next time, stay crafty!
Steph
It's actually quite fitting that I'm playing along today at Freshly Made because there's (finally) fresh air outside. It's been so hot and humid around here lately that I really missed having the windows open. Such a nice change!
Anyway, here is my card:
Okay, so I roughed up the edges just a tad. But not too much, so I think it still qualifies for "fresh" and "clean-lined", no?
I finally got around to using the Fine Feathers stamp set. It's one that drew my attention immediately in the new catty, but every time I pulled it out, I just couldn't come up with anything. This sketch certainly got my creativity flowing with it... and it's about dang time! :)
I started with a very detailed section from the Fan Fair DSP pack. It featured some lace, a flower, a washed out map and the Eiffel Tower (mostly hidden). I then layered with a piece of Island Indigo card stock that I embossed with the Fancy Fan embossing folder. Next, I stamped two feathers in Pool Party ink on Very Vanilla card stock and then cut one feather out and popped it up with some Dimensionals. I wrapped some Pool Party Bakers Twine around and added a punched tag. I stamped the sentiment from the Just My Type set and elongated the tag by pulling the paper up and through the Jewelry Tag Punch. The trick is to have your paper the same width as the punch. You can then make the tag as long (or short) as you want. Cool, eh?!
To finish off, I used the retired Lace Border Punch and added some pearls. I mimicked this on the inside too by stamping a couple of feathers and adding the border again with the pearls.
What do you think?
Until next time, stay crafty!
Steph
6.25.2012
Love Colour
Today I'm participating in a colour challenge over at Stampin' Royalty. Although I refer to my Colour Coach on occasion, I often forget about referring to that wonderful tool! Colour Challenges are a fantastic way to use colours together that you might not have thought to use together.
I wasn't too keen on these colours at first, but once I got creating I discovered how awesome they look together!! Here is my card:
See what I mean?! The colours look great together. I used a bunch of new product that I just got last week (but didn't have a chance to play with it until yesterday!). I used the new Butterfly Punch... isn't it so elegant?! I also used the new Fancy Fan Textured Impressions Embossing Folder. I love this new folder... I'm so happy SU! had a replacement in mind for the plates they retired with this lovely pattern on it. I embellished with some teeny pearls, some Pool Party Baker's Twine and had to add a brad as an after thought because it covers a smudge. :D But you didn't need to know that because you'd never be able to tell! I thought the butterfly brad from the 2012 SAB redemption pack worked perfectly... even though it's not available any more.
Until next time, stay crafty!
Steph
I wasn't too keen on these colours at first, but once I got creating I discovered how awesome they look together!! Here is my card:
See what I mean?! The colours look great together. I used a bunch of new product that I just got last week (but didn't have a chance to play with it until yesterday!). I used the new Butterfly Punch... isn't it so elegant?! I also used the new Fancy Fan Textured Impressions Embossing Folder. I love this new folder... I'm so happy SU! had a replacement in mind for the plates they retired with this lovely pattern on it. I embellished with some teeny pearls, some Pool Party Baker's Twine and had to add a brad as an after thought because it covers a smudge. :D But you didn't need to know that because you'd never be able to tell! I thought the butterfly brad from the 2012 SAB redemption pack worked perfectly... even though it's not available any more.
Until next time, stay crafty!
Steph
Subscribe to:
Posts (Atom)