Follow My Blog

Follow on Bloglovin

12.30.2012

We're Back!

We're back from our holidays over at Sunday Stamps and hope you'll play along with us this week. We've got a colour challenge for you - Night of Navy, More Mustard & Sahara Sand:

Paper: Night of Navy, Sahara Sand, More Mustard
Ink: Night of Navy, More Mustard
Stamps: Simply Soft (Hostess, Retired)
Tools: Mini Curly Label Punch (Sneak Peek SAB Item!), Big Shot, Beautiful Wings Embosslits
Accessories: Linen Thread
I know the stamp set I used is retired, but it just spoke to me as I was staring at all my sets wondering what I was going to create this week. I've had a tad of a struggle getting back into my stampin' after the holidays. :)

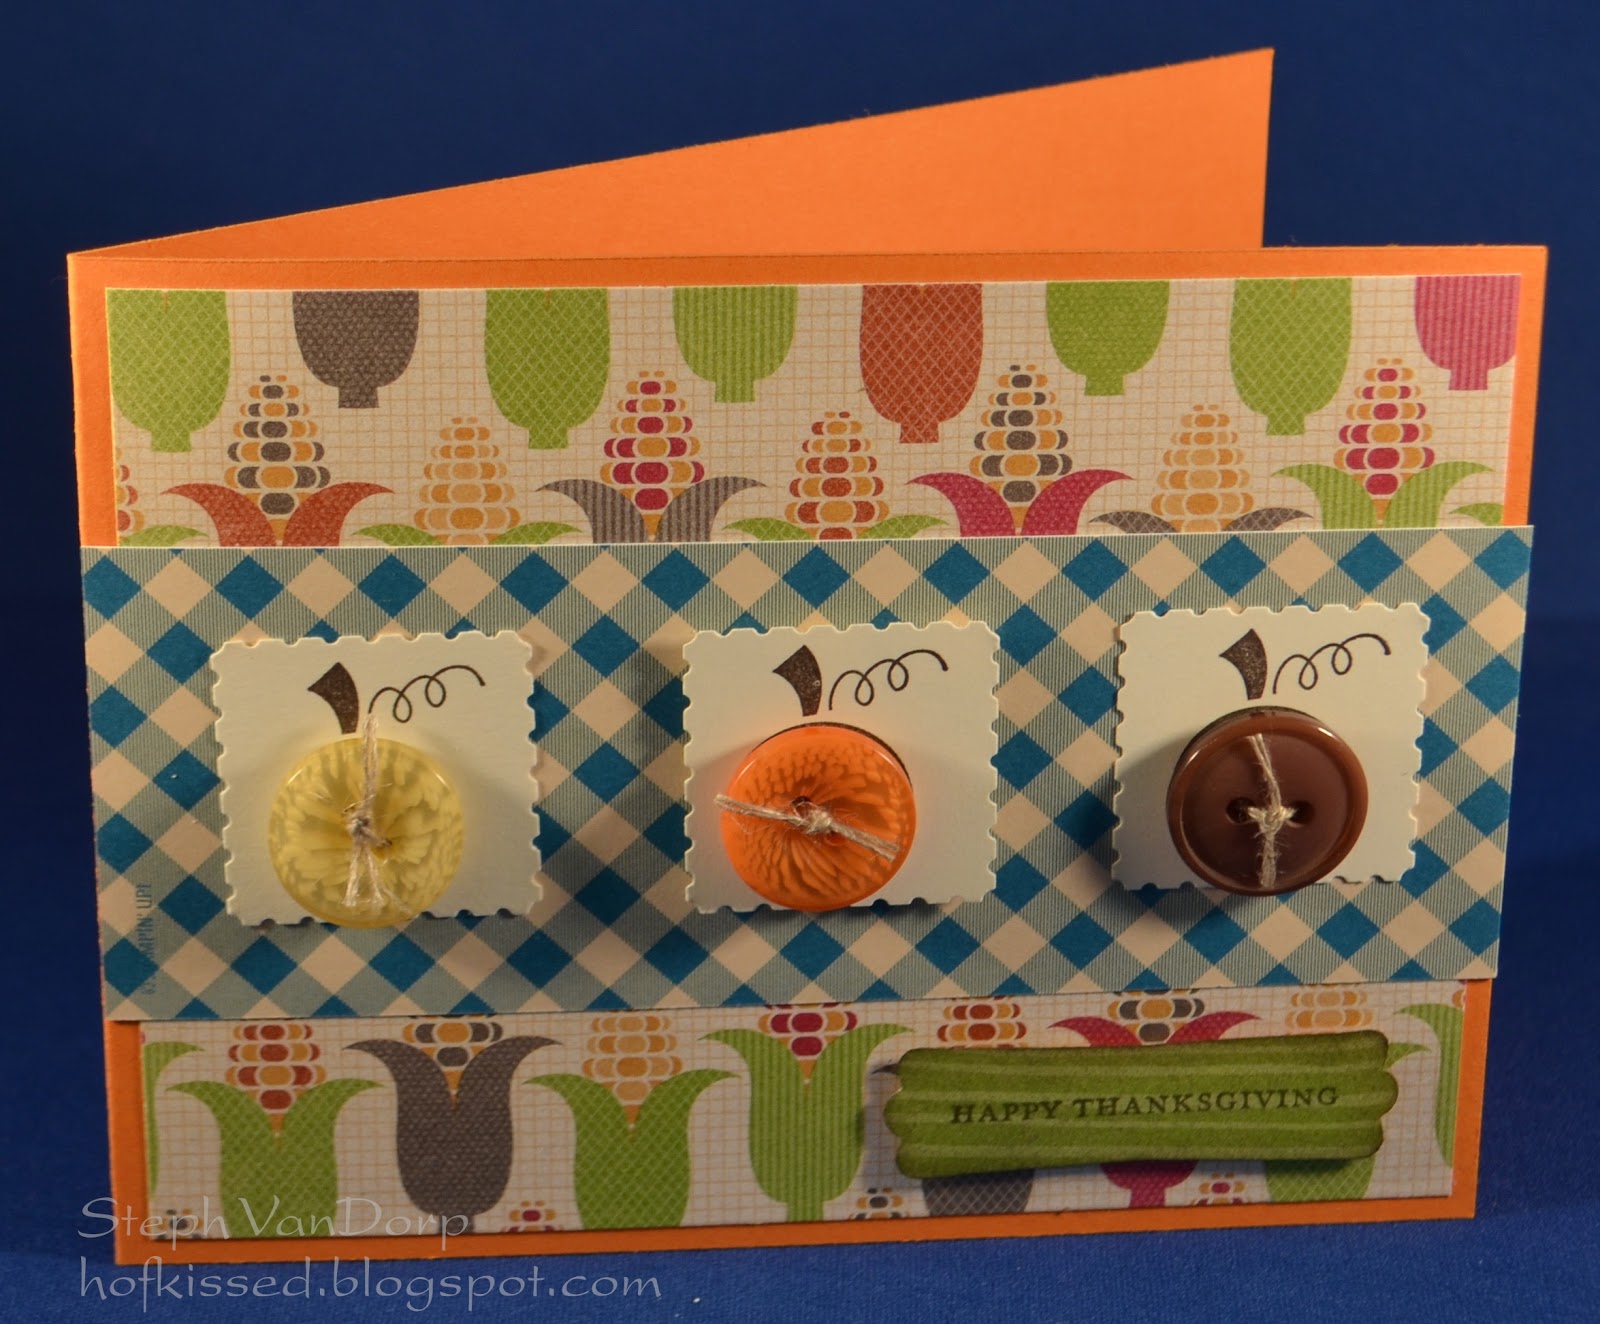
I started with creating a tiled look with the NEW Mini Curly Label Punch that will debut in the 2013 SAB catty starting January 22nd! I created different layers by punching in my card layer and using Dimensionals. After stamping my image, I created a bow using Linen Thread and added some butterflies.

What do you think? Hope you'll play along with us this week!


Until next time, stay crafty!
Steph

12.29.2012

Happy Dirtday!

Today I'm showing a card I made for my daughter's friend who turned 4 last week. This was the first time I inked up my I Dig You stamp set:

Paper: Chocolate Chip, Very Vanilla, Packing Paper
Ink: Real Red, Daffodil Delight, Tempting Turquoise, Chocolate Chip, More Mustard, Old Olive
Stamps: I Dig you, Memorable Moments
Technique: Paper Piecing

I created a dirt hill from the packing paper I received in one of my shipments - I tore the edge and crumpled it up to give it some texture. I stamped my dump truck in Chocolate Chip and before paper piecing the cab and bin, I stamped a bunch of fours.

To finish up, I stamped a set of presents in the dirt hill and the sentiment. This card was a hit with both the four-year-old and his parents.

What do you think?

Until next time, stay crafty!
Steph

12.25.2012

Merry Christmas

Wishing you & yours a very Merry Christmas and a healthy and happy holiday season!

Paper: Very Vanilla, Soft Suede, Festival of Prints DSP Pack
Stamps: Snowflake Soiree
Tools: Big Shot, Window Framelits, Lacy Brocade TIEF, Heat Tool
Accessories: Gold Embossing Powder, 1-1/4" Cherry Cobbler Ribbon (retired)
Techniques: Heat Embossing
Of course, I also have to show you my last Christmas card of the season. :) This card was made using scraps on my desk from previous projects, but I like the way it turned out and I hope you do too. I added a banner out of ribbon and some heat embossing. I also popped up the ornament to give the card some depth.

Until next time, stay crafty!
Steph

12.24.2012

Sparkly Snowflakes

It's my second to last day to show you some Christmas cards... it's a snowflake card:

Paper: Island Indigo, Whisper White
Ink: Island Indigo
Stamps: Snowflake Soiree
Tools: Blossom Punch
Accessories: Dazzling Diamonds
This is a CAS card using just two main items - the Snowflake Soiree stamp set (that has both images and sentiments), and the Blossom Punch that just so happens to fit one of the snowflake images.

To add lots of sparkle, I used Dazzling Diamonds on the snowflakes and sentiment.

Hope you like it...

Until next time, stay crafty!
Steph

12.23.2012

Christmas Lights

As promised in yesterday's post, here is another card using Crystal Effects:

Paper: Daffodil Delight, Whisper White, Island Indigo
Ink: Island Indigo, Real Red, Old Olive, Tempting Tourquoise
Stamps: Jolly Bingo Bits, Wacky Wishes (Hostess)
Techniques: Crystal Effects

This card is a CASE from one I saw online, but unsure who to give the credit to. I used my Stampin' Write Markers for the lights and then to draw in the wire. I covered each light with Crystal Effects and like yesterday's card, it's hard to tell in the photo that each light is raised and shimmers.

This was a fun and funky card using bright and non-traditional Christmas colours... not my typical style Christmas card, but I like it!

What do you think?

Until next time, stay crafty!
Steph

12.22.2012

Christmas Candy

I don't know about you, but around here, Christmas and the holiday season is filled with lots of food and yummy treats... so I thought I'd share this card with you today:

Paper: Whisper White, Be of Good Cheer DSP, Cherry Cobbler
Ink: Cherry Cobbler
Stamps: Delightful Dozen, Jolly Bingo Bits
Tools: Border Punch
Techniques: Crystal Effects
It's hard to tell from the photo, but I used Crystal Effects to raise and give a shimmery look to all the candy treats. I forgot how great this stuff is! Once I applied it on these, I couldn't stop and created several cards with the same effect (will show the next card off tomorrow). It did take a couple of hours to dry, but leaving it overnight to be sure is always a good idea.

Once my panel was all ready to go, I didn't do much else other than add a few banners and a sentiment. I wanted the focus to be on my yummy candy treats.

What do you think?

Until next time, stay crafty!
Steph

12.21.2012

Tree Shining Bright

Since we're so close to Christmas, I'll be posting the few last Christmas cards for 2012. Today's card has a lot of sparkle, thanks to the Glimmer Paper!

Paper: Pool Party, Very Vanilla, Champagne Glimmer Paper
Ink: Soft Suede
Stamps: More Merry Messages
Tools: Big Shot, Delicate Designs TIEF, Lacy Brocade TIEF, Holiday Framelits
Accessories: Cherry Cobbler Seam Binding Ribbon
With a little raised texture from the embossing folders, some colour from the Seam Binding Ribbon and lots of bling with the Glimmer Paper, this card came together quickly and has a CAS look to it that I just love. Also feeling the non-traditional colour scheme for Christmas.

What do you think?

Until next time, stay crafty!
Steph

12.18.2012

Yummy Goodness

These gingerbread cookies look good enough to eat thanks to the Scentsational stamp set and coordinating Holiday Collection Framelits.

Paper: Always Artichoke, Very Vanilla, Festival of Prints DSP Stack
Stamps: More Merry Messages, Scentsational
Ink: Chocolate Chip
Tools: Big Shot, Holiday Collection Framelits, 1-1/4" Scallop Punch
Accessories: Jewels, 1/8" Real Red Taffeta Ribbon, Red Dazzling Details
This isn't an original idea... there are many cards floating around the WWW with half-eating gingerbread cookies. I used the 1-1/4" Scallop Circle to take chunks out of my gingerbread cookies. Then I added some Dazzling Details and popped each up with Dimensionals.

The sentiment is from More Merry Messages and to finish off, I added some ribbon trim with a tiny bow and jewels for added detail and bling.

Until next time, stay crafty!
Steph

12.16.2012

Watercolor Easel

Today is another sketch over at Sunday Stamps... my sketch in fact! Hope you'll play along with us this week! Actually, you have TWO WEEKS to play along! The challenge closes Saturday, December 29th.


Paper: Whisper White, Brushed Gold Specialty, Neutrals DSP Pack
Ink: Soft Suede, Gold, Versamark
Stamps: Watercolor Winter, Come to Bethlehem
Tools: Lace Border Punch (retired), Heat Tool
Techniques: Heat Embossing
Accessories: Pearls
I'm just about at the end of making Christmas cards. I know you've probably heard me say that several times already, but I really am nearing the end. :) I still had a few more cards to make for clients, so why not show them off to you too.

I followed the sketch pretty closely and ended up making an easel-type card. I added lots of shimmer with the Brushed Gold Specialty Paper, gold ink and heat embossing. I did a lot of fussy cutting with this card, but I think it was worth it.

I hope you like what I've created and are inspired by the design team this week so that you can play along with us over the holidays!

Until next time, stay crafty!
Steph

12.14.2012

Clearance Rack Blitz!


Beginning today, Stampin' Up! has added almost 300 products to the Clearance Rack in the Online Store, with some discounted up to 80 percent!!

Hurray up and place your order as these are only available while supplies last! Also, only available on online orders.

SU! has added stamps (surprising!), ink, markers, tools & accessories, & much, much more! What are you waiting for?! Go to my online store and check out the savings!

Happy Shopping!
Steph

12.12.2012

Christmas Scraps

Can you believe that Christmas is less than two weeks away?! I can't! Like every year, this time is always crazy busy and I've been in full Christmas production crafting mode for many months now. With all the crafting and cutting, I'm left with a ginormous pile of scraps... so I decided to make some cards using mostly scraps I had lying around. Take a look:

Paper: Very Vanilla, Poppy Parade, Whisper White
Ink: Cherry Cobbler
Stamps: Greetings of the Seasons, Jolly Bingo Bits
Tools: Big Shot, Petals-a-Plenty TIEF, Scentsational & Labels Framelits
I was able to make four identical cards using these scraps: a cutout from the Labels Framelits, tree cutouts from the Scentsational Framelits because I had made many tags with the negative cutout of this image and a piece of Poppy Parade card stock left over from making my Santa Gum casings.

After a little stamping and embossing, this card came together quickly! Why not try making something with the scraps you have lying around? You'll be surprised what you can make!

Until next time, stay crafty!
Steph

12.09.2012

Snowflake Ballerina

Welcome to another week at Sunday Stamps! This week is a colour challenge, so you're free to do what you want with the colour scheme. As much as I wanted to steer away from Christmas (because I'm tired of making Christmas cards already), I just couldn't resist with Holly's colour theme this week.

My card was 100% inspired by some snowflake ballerina garland I saw on Pinterest:

Paper: Real Red, Basic Black, Brushed Silver Specialty, Printer Paper
Ink: Versamark
Stamps: The Sounding Joy (retired)
Tools: Heat Tool, Black Embossing Powder
Accessories: Dazzling Diamonds

Here is the link to the template I used to cut out the ballerina. As soon as I saw these ballerinas in Pinterest, I thought about The Nutcracker and just had to make one to fit on a card. I used the template found on the website, brought it into MDS and resized it. The tutu was cut by hand from a 3x3 piece of paper. I used ordinary printer paper for both because of the numerous folds in the tutu.

To add some sparkle and bling, I covered the tutu in Dazzling Diamonds and heat embossed the sentiment.

I hope you're inspired to play along with us this week!


Until next time, stay crafty!

Steph

12.08.2012

Thin Snowman in Disguise

I just recently (finally!) purchased the Snow Much Fun stamp set during the recent sale. I've loved it for a long time but it just always got pushed down on my wish list. This is the first card I've made with it:


Paper: Whisper White, Bashful Blue
Ink: Black
Stamps: Snow Much Fun
Tools: Big Shot, Northern Flurry TIEF, Circle Punches - 1", 1-1/4", 1-3/8"
Accessories: Real Red Grosgrain Ribbon (retired), Linen Thread, Dazzling Details
I don't know why my brain thought to disguise this thin snowman into a fat one, but it seemed cool in my head, so I created it! The card is 4-1/4" square. I scored it at 2-1/2" and 6-3/4". I stamped the snowman twice - once on Whisper White and a second time on Bashful Blue. I used my circle punches to punch him out and then used the punched Whisper White piece as a template to make sure I got my circles punched in the right spot on the front of my card.

I didn't want to have any other stamping on the card, so I ran my base through the Big Shot using the Northern Flurry TIEF for added texture. I paper-pieced my circles together on my Bashful Blue piece and then added my ribbon trim for some added colour. To finish things off, I used Dazzling Details on all his buttons.

What do you think?

Until next time, stay crafty!
Steph

12.06.2012

MDS Tags

Don't you just love MDS2?! If you haven't yet tried it, what are you waiting for?? You can try it out for 30 days for FREE! Click here to give it a try.

One of the many things I love about MDS2 over the original is that you're able to colour stamps using multiple colours. Check out this tag I created:


I love creating hybrid projects because as much as I love MDS, I still love working with my hands too. :) I created the bird image in MDS so that it would fit inside my XL Oval punch. Once I sized it, I started colouring the image. So quick & simple! I printed several on my home printer and punched them out.

The tag itself is cut using the Layered Labels Framelits and I rounded off the one end. I cut a banner from Cherry Cobbler Coredinations and ran it through my Woodgrain TIEF. Gave it a slight sand and glued it to the tag. I popped up my bird with Dimensionals.

For the "bow" at the top, I cut strips of Tulle from Cherry Cobbler & Crumb Cake. I gathered it and tied with Linen Thread in the middle and then looped it through my tag and tied it in place.

I hope you like... why don't you give MDS2 a try?!

Until next time, stay crafty!
Steph

12.04.2012

100 "Likes"!

 
My Facebook page reached 100 "likes" this morning... so I'm having a draw! If you don't "like" Hofkissed on Facebook yet, what are you waiting for?! Especially since there will be a draw today for Hofkissed Christmas merchandise (all handcrafted paper goods!).


Aside from that, I'll also share a project with you... perhaps one that will be given to the winner of my draw this afternoon (among other things)! Some adorable gift tags:


Paper: Naturals Ivory, Whisper White
Ink: Riding Hood Red, Gumball Green, Black
Stamps: No Peeking
Tools: Big Shot, Two Tags Bigz Die, Scallop Punch
Accessories: Pear Pizzazz Baker's Twine, Jewels

Don't you just love these little characters?! They're from the No Peeking set. I coloured directly on the stamps with my Stampin' Write Markers and then punched them out with my Scallop Punch. I did the same for the sentiment (minus the punch). The tag was created with one of the two you get when you roll the Two Tags Bigz Die through the Big Shot. The scallop fits perfectly with it.

To finish off, I added some Baker's Twine and a few jewels for some bling.

Don't forget to get on over to Facebook to "like" my page (if you haven't already) and then comment on my post there about my draw for a second entry today by 2 p.m. EST.

Until next time, stay crafty!
Steph

12.02.2012

Frosty Friends for Sketch Week at Sunday Stamps!

It's sketch week over at Sunday Stamps! Monica has prepared a good one this week...

Paper: Pool Party, Whisper White, Festival of Prints DSP
Ink: Island Indigo, Black, Stampin' Write Markers
Stamps: Frosty Friends, Merry Messages (retired)
Tools: Big Shot, Perfect Polka Dots TIEF, Layered Labels Framelits
Accessories: Whisper White Sweater Trim, Jewels


I veered slightly away from the sketch this week, but I think it still works! This is the first time I've gotten a chance to ink up Frosty Friends. Such an adorable Á la Carte stamp. It's hard to tell in the photo, but I stamped on a piece of printed vellum (with snowflakes on it), coloured the image and then puffed up the snowmen for a 3D look.

I added some texture with the Perfect Polka Dots TIEF and what better accent than Sweater Trim?!

Hope you'll play along with us this week!


Until next time, stay crafty!
Steph


11.30.2012

Peace on Earth

Wouldn't that be nice?! Today's card is a CASE of Connie Stewart's card I found on Pinterest. I just absolutely fell in love with it.

Paper: Whisper White, Midnight Muse
Ink: Gumball Green
Stamps: Merry Minis, Greetings of the Season
Tools: Scallop Punch, Merry Minis Punch Pack, Heat Tool, Big Shot, Perfect Polka Dots TIEF
Techniques: Heat Embossing
I changed out the sentiment she used because I just found this card so peaceful and thought the sentiment I used from Greetings of the Season fit perfectly. I heat embossed it in silver for some added texture and elegance. I just love this card!

What do you think?

Until next time, stay crafty!
Steph

11.29.2012

Folded Tree Tags

I made so many of my mini folded trees (see the tutorial here) that I was sick of making cards with them... so here are some tags!

Paper: Jolly Holiday, Be of Good Cheer, Crumb Cake, Naturals Ivory
Ink: Cherry Cobbler, Old Olive
Stamps: Merry Messages
Tools: Merry Minis Punch Pack (star)
Accessories: Baker's Twine
I created the tag in MDS because I wanted to make multiples of them and it was a quick and simple way for me to measure and cut them all out. Instead of a tag hole at the top, I used the star from the Merry Minis Punch Pack which is also the star at the top of my tree. I added a "snow bank" at the bottom with ripped paper and a simple sentiment from the retired set, Merry Messages. There is plenty of space to write on the back.

What do you think?

Until next time, stay crafty!
Steph

11.28.2012

Open Sleigh

Loved Open Sleigh the moment I saw it in the Annual Catalogue, but this is the first time I've inked up the images! Check it out:

Paper: Crumb Cake, Midnight Muse, Very Vanilla
Ink: Crumb Cake, White
Stamps: Open Sleigh
Tools: Big Shot, Perfect Polka Dots TIEF
I wanted to keep this card really simple. There's no bling or embellishments... just a bit of texture! I think it's kinda vintage looking too. I created a tone on tone card, but popped the layer up slightly and sponged the edges to give it some depth. I created some simple banners and I really like the way this turned out. Inside I used the sentiment from the same set: "It is Christmas in the heart that puts Christmas in the air."

What do you think?

Until next time, stay crafty!
Steph

11.27.2012

Mr. & Mrs. Snowman

Today I have a couple of cute tags to show you. I have seen many like this floating around the net, so I can't credit just one person with the idea. For my tags though, I used the stamp set Stylin' Snowfolk and that I have not seen yet. :)

Paper: Whisper White, Basic Black
Ink: Black, Peach Parfait, Blushing Bride, Pool Party
Tools: Big Shot, Two Tags Bigz Die, Modern Label Punch, Curly Label Punch
Accessories: Basic Grey Ribbon, Primrose Petals Satin Stitched Ribbon, Baker's Twine
The base is a tag using the Two Tags Bigz Die. For the "Mr.", I made his hat using 1/2 the Curly Label Punch and the Modern Label Punch. All the stamping is using the Stylin' Snowfolk stamp set. Perhaps I was inspired by Movember, which is why I gave my "Mr." a stash... to finish off, I added a ribbon scarf to each.

I made this cute couple into a pair of hanging tags. Perfect for holiday gifts!

What do you think?

Until next time, stay crafty!
Steph

11.25.2012

It's All Colour Over at Sunday Stamps!

Good Morning! Today is Tara's Colour Challenge over at Sunday Stamps... pop by and play along with us.

I decided to make a Christmas card because the colours, like Tara thought, would be a great Christmas pallette. Take a look:

Paper: Crumb Cake, Real Red, Whisper White
Ink: Bashful Blue
Stamps: Stylin' Snowfolk, Many Merry Messages
Tools: Big Shot, Norther Flurry TIEF, Lacy Brocade TIEF, Adorning Accents,
Circle Punches - 1", 1"3/8 & 1-3/4"
I CASEd this card from my upline Leena Girsa, it was just too cute not to! It's pretty simple when you've got the right punches to create the snowman. I added lots of texture to this card with embossing folders and I think it works.

I opted out of giving my snowman a face or accessories... other than that adorable top hat! To finish up and add a little bling, I dotted my eye with a jewel.

Head on over and play along, we would love to see what you come up with this week!

Until next time, stay crafty!
Steph

11.23.2012

Mini Tags

Who doesn't need tags at Christmas? Well, I've made it easy with these mini tags... check 'em out:

Paper: Festival of Prints, Be of Good Cheer, Jolly Holiday (Retired),
Merry Moments, Whisper White, Very Vanilla
Tools: Ornament Punch, Merry Minis Punch Pack

I've created mini tags that are 2x2 to fit inside a little box. There are three styles and several different patterns included! The first two I just cut a 2x4 base and scored in half. The ornament I scored a piece of paper and then punched with the Ornament Punch. I used the Merry Minis Punch Pack shapes to punch out from one tag and then used those remnants to create another tag. No waste here!

I will be selling them at my Craft Show this Sunday... 20 per box. I think they'll be a bit hit!

What do you think?

Until next time, stay crafty!
Steph

11.20.2012

WHISKing a Merry KISSmas

Today I have a kitschy project I made for my Craft Show this weekend! If you're in the Kitchener/Waterloo area and surround, I hope you'll stop by Edelweiss Tavern between 11 and 4 on Sunday, November 25th to see me...

This was just too cute an idea to pass up, but not sure how well they'll sell:


I created the tag in MDS. So simple! Then I cut it using my Framelits and added some texture with my Petals-a-Plenty TIEF. Before putting it all together, I stamped the pine branches from Watercolor Winter in Lucky Limeade, Old Olive & Pear Pizzazz. I stamped off once for each colour so it wouldn't be too bold.

What do you think?

Until next time, stay crafty!
Steph

11.19.2012

Savings Extravaganza!!


For the next 10 days, Stampin' Up! is having a savings extravaganza! Great deals are to be had between now and the 28th! You can save up to 50% off select merchandise...

Download the PDF flyer here for all the details, and be aware that some deals are for 24-hours only.


TODAY ONLY:
20% off Simply Scored Diagonal Plate
20% off Big-Shot Die-Cutting Machine - Add wonderful die-cut images and texture like in the photos above... and at 20% off today, who could resist?!
20% off Big Shot Doctor's Bag

WEDNESDAY, NOVEMBER 28TH ONLY:
20% off Clear Block Bundle (Blocks A - I)
20% off Clear Block Storage Caddy
20% off Stack & Store Caddy

NOVEMBER 19th - 28th:
20%, 25%, 30%, 40% & 50% off Stamps, Tools & Accessories!
See attached flyer for specifics - product codes, catalogue pages, names & prices

So what are you waiting for?! Check out the attached PDF, make your list, check it twice & place an order. Don't forget to keep an eye on the Clearance Rack too for extra savings.

Please don't hesitate to contact me for more information and shop comfortably through my online store.

Happy Savings!
Steph

11.18.2012

Christmas Wreath for Sunday Stamps

It's Sunday, so that means another challenge over at Sunday Stamps! This week is a fun sketch challenge from Haley, hope you'll play along. Don't forget that every time you do this month, you'll be entered in a draw for a chance to win one of two $25 SU! gift certificates!

Paper: Crumb Cake, Very Vanilla, Gumball Green
Ink: Early Espresso
Tools: Big Shot, Woodgrain TIEF, Lacy Brocade TIEF,
Punches - large & small Scallop Circles, 1-1/4" Scallop Circle
Accessories: Cherry Cobbler Seam Binding Ribbon, Jewels


As I was typing out the supply list above, I realized I didn't use any stamps on this card! WHAT?! Well, I guess I didn't need any. haha. When I saw the sketch this week, I immediately thought it looked like a door, so, that's what I created!

My card base is a gate-fold. I embossed the panels with the Woodgrain TIEF and then added my next layer with a Christmas wreath. The wreath uses all our scallop circle punches, including the NEW 1-1/4". I popped up one of the layers with Dimensionals and added some sharpie-coloured jewels for some holiday sparkle. The ribbon is dual purpose - adds some elegance and keeps my "door" closed. :)

What do you think?


Until next time, stay crafty!
Steph

11.17.2012

Stampin' Up! Has Done it Again!!


That's right, SU! has done it again... unbelievable deals are to be had starting Monday, November 19th! Some items are 24-hour only sales and others last until the 28th... 10 days of savings! Check out the chart below for all the details. Items range from 20 to 50% off!!!

Click here to download your copy of the flyer... it's 3 pages long! There are BIG savings - the Big Shot (24-hour only sale), Jewels, Punches, Stamps & more! Don't forget to check out the Clearance Rack too when you place your order for extra deals!

So what are you waiting for?! Print off your flyer and start planning your list... the sale starts Monday, November 19th!

Until next time, stay crafty!
Steph

11.15.2012

A Party Dress

Gotta love the tulle Stampin' Up! has in the current Holiday Catalogue. So many great uses for it. That's what I used to create a dress for this card:

Paper: Pretty in Pink, Early Espresso, Naturals Ivory
Ink: Early Espresso
Stamps: Established Elegance
Tools: Big Shot, Lacy Brocade TIEF, Corner Rounder
Accessories: Crumb Cake Tulle, Pearls, 1/8" VV Ribbon, Gold Glow Smooch Spritz
I'm in love with my creation. :) I can say that, right?! I used the dress form stamp as my base and then gathered the tulle over top of it and tied it together with a ribbon to form a "belt". To add more elegance to this card, I added some texture with the Lacy Brocade TIEF, Smooch Spritz and a pearl. I also added some sponging for a bit of a vintage feel.

I left a sentiment off this card because I think it could work for any number of special occasions - birthday or bridal shower, to name a couple.

What do you think?

Until next time, stay crafty!
Steph

11.13.2012

No Peeking!

I just love the little characters from the No Peeking stamp set! Today I created a card with the cute penguin...

Paper: Crumb Cake, Early Espresso, Whisper White
Ink: Real Red, Gumball Green, Black, Peach Parfait
Stamps: No Peeking
Tools: Punches - Scallop Circle, Decorative Label, Scallop Oval
Accessories: Early Espresso Baker's Twine
To go with the "no peeking" sentiment, I made my card look like a brown package tied up with string. I punched a peek through window for my penguin, which I coloured using Stampin' Write Markers so that I could get multiple colours on one stamp. I used the same technique for the sentiment.

Pretty simple, but so darn cute...

Until next time, stay crafty!
Steph

11.12.2012

Button Buddies Harvest

Even though Thanksgiving is long gone for us Canadians, the US will be celebrating in just a couple weeks. As I mentioned in my last post, I had to create some Thanksgiving cards for a client for her US friends and here is another one I made:

Paper: Pumpkin Pie, Harvest DSP, Very Vanilla
Ink: Early Espresso
Stamps: Button Buddies, Teeny Tiny Wishes
Tools: Postage Stamp Punch, Modern Label Punch
Accessories: Buttons, Linen Thread
This one didn't require much thought because Button Buddies does the work for you. Our buttons coordinate so nicely with this stamp set! I love the Harvest DSP too and the colours are just so festive for this time of year.

Until next time, stay crafty!
Steph

11.11.2012

It's a Colour Challenge!

This week at Sunday Stamps, we've got a colour challenge for you - it's all about Fall, ya'll! How perfect this was for me because I needed to make some Thanksgiving cards for a client to send to her US friends who will be celebrating in a couple of weeks.

Paper: Early Espresso, Cajun Craze, More Mustard, WW, VV
Ink: More Mustard
Stamps: Teeny Tiny Wishes
Tools: Big Shot, Square Lattice TIEF, Modern Label Punch, Word Window
Accessories: Half Back Pearls (retired), Baker's Twine

I hope you can play along with us this week... don't forget that every time you enter a challenge this month, you will be entered in a draw for a chance to win one of two $25 Stampin' Up! gift certificates!

Until next time, stay crafty!
Steph

11.09.2012

Mini Bag of Candy

Today I have a super cute bag to share with you that requires no gluing... and is made from only one sheet of 8-1/2 x 11 cardstock! Oh, and you also don't need to cut anything. :)


Paper: Real Red, Whisper White
Ink: Real Red, Cherry Cobbler, Gumball Green, Early Espresso
Stamps: Layered Labels, Watercolor Winter
Tools: Big Shot, Labels Framelits, Scallop Oval Punch, Apothecary Framelits, Simply Scored
Accessories: Certainly Celery Grosgrain Ribbon (retired), Pearls, Dimensionals

This bag is super easy thanks to Silvey's Tutorial. Instead of adding handles to mine, I simply closed it up with a nice bow and decorated the front with a label. The inside is filled with yummy Werther's candies (26 to be exact). I plan to sell these at my upcoming Craft Show.

What do you think?

Until next time, stay crafty!
Steph

11.04.2012

Sunday Stamps Sketch Challenge!

I'm so excited to be a Designer for Sunday Stamps! This is my first official design for the team and I'd love for you to head on over and play along this week. It's lots of fun and gets your creative juices flowing! This week is a sketch challenge and here is my design:


Paper: Primrose Petals, Very Vanilla, Birds of a Feather DSP, First Edition DSP
Ink: Soft Suede, Midnight Muse, Primrose Petals
Stamps: Everything Eleanor, Petite Pairs
Tools: 2-1/2" Circle Punch
Accessories: Jewels
I stuck pretty closely to the sketch and thought it would be fun to punch out the shape to have a "peek through" window. To coordinate the jewels, I coloured them with a Sharpie to mimic Midnight Muse. Did you know you can do that?!

So, what are you waiting for? Go check out Sunday Stamps and this week's sketch!


Until next time, stay crafty!
Steph

11.02.2012

Gum Anyone?

Today I have another stocking stuffer I'm preparing for my upcoming Craft Show (November 25th). Who wouldn't like to receive a pack of gum in their stocking this year, when it looks like this!


Paper: Real Red, Whisper White, Basic Black, Basic Gray
Stamps: Delightful Decorations
Ink: Real Red
Tools: Big Shot, Petals-A-Plenty TIEF, Curly Label Punch, 3/4" Circle Punch

These are fairly easy to make... a little scoring, some cutting and a couple of punches and the project is complete! I think I might omit the punched hole at the top because not all my gum has that cutout, but other than that, I'm ready to make lots of this one!

Until next time, stay crafty!
Steph