The card above is a triangle twist & fold card that I demonstrated to my team today. I showed off several versions of it, but this was my favourite.
Since I was on holiday last week when my August Paper Pumpkin arrived, I couldn't wait to crack it open when I got back. Leave it to me to create an alternative project with it... even before creating the intended one. ha. If you've seen some of my other posts about my Paper Pumpkin, you know how much I enjoy "thinking outside of the box". I fussy cut the one image out from the card base and wanted to glue it to a white card base, popping it up and adding some of those awesome vellum leaves. Anyway, it wasn't until most of my project was glued down that I notice I had adhered it all to the back of one of the other cards. haha. So, I turned it into a display piece/greeting card. A happy accident, I think!
I mentioned above that I was playing around with some new products... well check out this awesome tree die from the new Holiday Catalogue (out September 5th). I cut several of the trees from all of the glitter colours I had, turned them upside down and layered them to create a Christmas tree. I love the sparkle!!
I also did a little scrapbooking on the weekend! I thought I'd get my honeymoon pictures all sorted... we'll be celebrating 10 years in September. hehe. Can you believe I've kept all the pamphlets and tickets and memorabilia all these years?! I used some of them on this layout. I have a regular 4x6 photo album (5 photos per page), but didn't want to just stick all the photos in there. So.... I started with two 10" x 12" pieces of cardstock and created my pages. Once everything was glued down, I cut the pages down (gasp!) to five 4" x 6" pieces to fit in all the slots. I think it gives the "boring photo album" a boost!
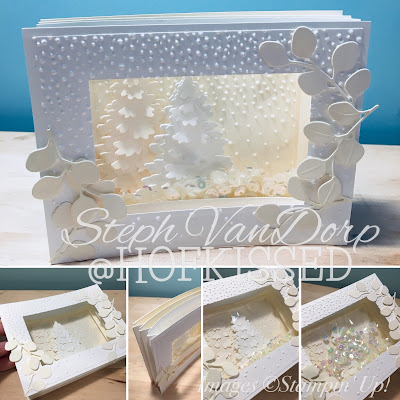
Remember that tree card above? Here's another project I created with some more of the dies from that same set. I was planning to created a frame card, but the project took on a life of it's own. It still folds flat, but became too bulky for an envelope. I turned it into a home decor piece instead. It'll be perfect for "decking my halls" this holiday season. It's hard to tell in the photo, but I added an window layer with sequins... it shakes like a snowglobe!
Lastly, I fixed up this piece I found at a second hand shop a few months back. The colours were perfect for my studio and it already had the clips to house projects. I added banners that read "inspire, create & share" using various punches and handstamped all the letters too. I couldn't resist to throw in one more little card/home decor piece on my display. Did you notice what I used to create that piece?
Thanks for popping by and taking a peek. Told you I was busy... hope you liked what you saw. ;)
Until next time, stay crafty!
Steph


