Follow My Blog

Follow on Bloglovin
Showing posts with label Technique: Distressing. Show all posts

10.12.2013

Falling Leaves

It's the countdown to Thanksgiving here in Canada, so as you may have noticed already, I've been showcasing fall and Thanksgiving cards this week. :) It's my favourite time of year!


I used the masking tape technique for this card. I think it's a perfect fit! It created a rustic-looking base layer to my card. I used my oh-so-favourite, but sadly retired, French Foliage stamp set and then added some burlap for added texture. Truth be told, it was added to cover up a sentiment I didn't like. :) I'm glad to have made that mistake because the burlap really works for me. It give the card a lot of texture and dimension, plus, the smaller sentiment works better than what I previously used.

If you're interested in purchasing this card (and seeing more pictures of it), you can do so here.

Until next time, stay crafty!
Steph

RECIPE
Paper: Naturals White, Chocolate Chip
Stamps: French Foliage (retired), Teeny Tiny Wishes
Tools: Decorative Label Punch, Distressing Tool
Accessories: Brads, 1-1/4" Burlap Ribbon

Techniques: Masking Tape, Distressing

10.11.2013

Truly Grateful

I love My Digital Studio (MDS)! I use it all the time. I use it to create all my signage and advertisments for my business (including my business cards) and I utilize it a lot for making hybrid cards.


I loved the Truly Grateful stamp set when I first saw it in the Holiday Catalogue. But let's face it, it was one of many that I loved on my very long wish list. As I searched the online store, I discovered the digital stamp set and I did a little happy dance!

Now, there are things that you couldn't do with a digital brush set - emboss it for one thing, but there are lots of things that you can do. You can resize a stamp image (enlarge to a certain extent without pixelating it), colour it and place it anywhere you want. I created my harvest layer to the exact size I wanted. I fit four on a page, along with my sentiment and a few other digital images from the set for the inside.

I printed the sheets on my home printer, cut and punched and then I layered with some other items to create a hybrid card. For MDS, I am truly grateful. :)

If you love my work, aren't crafty, or just don't have the time, you can purchase this card in my online store here.

Until next time, stay crafty!
Steph

RECIPE
Paper: Naturals Ivory, Pumpkin Pie, Crushed Curry
Stamps: Truly Grateful Stamp Brush Set (MDS)
Tools: Artisan Label Punch, Scallop Oval Punch, Distress Tool, Chevron TIEF
Accessories: Brads, 1-1/4" Burlap Ribbon

10.06.2013

It's a Sketch Week!

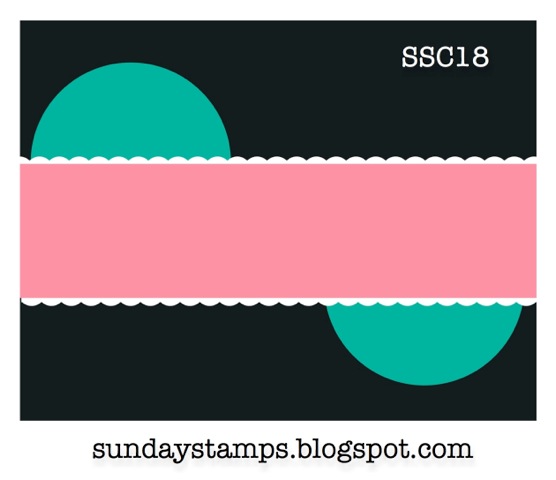
Well, a sketch week for two weeks that is! If you didn't know already, Sunday Stamps is a bi-weekly challenge now... leaves you plenty of time to join us!! This time around, Marie has a great sketch for us. It's her first time hosting a sketch, so show her some love and play along, won't you?


I kept my card fairly simple. Only one layer and no "bling". Gasp! I love it though. I added a couple more pieces than what appear in the sketch, but the basic elements are all there and that's what sketch challenges are all about.

Since next weekend is Thanksgiving here in Canada and Fall is my favourite time of year, I created a Thanksgiving card. The wavy element in the sketch reminded me of leaves blowing in the wind. I simply created a template from scratch paper to mask my area and stamped away. I then stamped the three leaves in Baked Brown Sugar, Summer Starfruit and Cherry Cobbler tone-on-tone on top of cardstock. I ruffly cut out each leaf, distressed the edges with my scissors and scrunched them up to give them more dimension. To add to the harvest feel, I took out some strings from the new burlap ribbon from the Holiday Catalogue (LOVE it!) and tied together with a piece of twine.

Hope you'll play along with us - you have until October 18th! Don't forget to check out the rest of the DT Designs too because they will inspire you!


Until next time, stay crafty!
Steph

RECIPE
Paper: Very Vanilla, Cherry Cobbler, Baked Brown Sugar, Summer Starfruit
Ink:
Cherry Cobbler, Baked Brown Sugar, Summer Starfruit
Stamps: French Foliage (retired)
Tools: Word Window Punch, Modern Label Punch
Accessories: Twine, 1/4" Burlap Ribbon
Techniques:
Distressing

9.26.2013

Piece of Cake

For an SU! event I attended a couple of weeks ago, I created a swap card. Check it out:


Lots of techniques on this card - distressing, clear block stamping & paper piecing. I love SU! Designer Series Paper (DSP) because it's double-sided and coordinates so beautifully. Makes paper piecing so easy!

You'd never know it, but I stamped the cake image on the back of the DSP I used (in the bottom corner) so that I could cut out the pieces I needed for the cake. I didn't have to waste any DSP this way and I hid it all with my top layer. ;)

If you'd like to purchase this card, you can do so here.

Until next time, stay crafty!
Steph

RECIPE
Paper: Crumb Cake, Very Vanilla, Birthday Basics DSP
Ink: Pool Party, Summer Starfruit, Early Espresso
Stamps: Sketched Birthday, Petite Pairs
Tools: Distressing Tool, Spritzer
Accessories: Summer Starfruit Satin Stitched Ribbon, Jewels
Techniques:
Clear Block Stamping, Distressing, Paper Piecing

10.07.2012

Sunday Stamps Challenge - Guest Designer

Good Morning & Happy Thanksgiving weekend to all the Canadians out there! I'm a little under the weather, but well enough to do some stamping and eat some turkey! :)

I have the pleasure this week to be a Guest Designer again over at Sunday Stamps. Lisa has a great sketch this week for you to try:


I love sketch challenges! When I saw the sketch, I wanted something to "peek" out from the circles. What better than some spooky characters from the Googly Ghouls set.


Paper: Basic Black, Cajun Craze, More Mustard, Orchard Harvest DSP
Ink: Crumb Cake, Early Espresso
Stamps: Googly Ghouls, Seasonal Sayings
Tools: Punches - Scallop Border, 2-1/2" Circle
Accessories: Googly Eyes
I started with a 2-1/2" circle in Whisper White and stamped the "Boooo" from Googly Ghouls in Crumb Cake repeatedly. Next, I stamped some of the cutesy characters from the same set - the mummy & spider, my favourites! Aren't they adorable?! I know, not something you'd say for Halloween, but they are! I sponged the edges in Crumb Cake too and mounted these on Cajun Craze that I tore.

For the middle section, I distressed a piece of DSP from the Orchard Harvest pack and mounted that to a piece of More Mustard card stock. I used the Scallop Border Punch on the edge and then moved it slightly and punched again. This gives a pointed and almost "spooky" look, I think. I sponged the edges of this one too.

To finish things off, I stamped the sentiment and cut and distressed some banners. I added a similar banner on the inside and of course added some Googly Eyes to those adorable scary characters. :)

Now head on over to Sunday Stamps and give the sketch a try! It's tons of fun...

Until next time, stay crafty!
Steph

7.02.2012

R is for Rest

Today is somewhat of a day of rest since here in Canada, most are taking today off in lieu of the Canada Day holiday yesterday. I found a small time-frame to stamp a little, but was having a creative block. So I turned to the Blogs out there...

One of my new favourite challenge blogs is Sunday Stamps. This week the ladies posted a sketch challenge and that's just what I needed to get inspired. Here's the sketch:


I've been using My Digital Studio (MDS) a lot lately for hybrid projects. This means that you create a portion of your project in MDS and then print it and finish creating with other stamps, paper, ribbon, etc. I have bought a lot of stamp brush sets in MDS that I don't have myself and especially ones that I might not use as often. It's an economical (and space-saving!) way to get all the images you desire. Plus, it's so easy to change the size or the colour and you can print right from your home computer!

Anyway, here is my hybrid card:


Although I've never been, sailing just seems like such a relaxing thing to do and since today is a day of relaxation, I thought this MDS stamp brush set was a perfect one to use. It's kind of funny that this is a Retirement card because this stamp set - Sail Away - is actually retired. Along with the Nautical Expeditions DSP, but the two are a perfect fit with one another. :)

I actually printed two sailboats and then cut the sail from one of them and popped it up. It gives a lot of dimension to an otherwise flat card. I also really distressed the edges of the DSP, sailboat and mat. I added some Bakers Twine and a Naturals Designer Button, both of which I thought looked a little nautical when paired with the DSP and sailboat. The sentiment on the front is from Teeny Tiny Wishes (my go-to sentiment set!) and the inside is from Occasions Alphabet. I must say that I don't use the latter set too often, but it really does pair well with many stamp sets and sentiments. Adds a little more oomph to a project.

What do you think?

Until next time, stay crafty!
Steph